python模块
一、python基本模块
1.1 模块打包
python有非常丰富的第三方库可以使用,很多开发者会向pypi上提交自己的python包。要想向pypi包仓库提交自己开发的包,首先要将自己的代码打包,才能上传分发。
distutils是标准库中负责建立python第三方库的安装器,使用它能够进行python模块的安装和发布。distutils对于简单的分发很有用,但功能缺少。大部分python用户会使用更先进的setuptools模块。
setuptools是distutils增强版,不包括在标准库中。其扩展了很多功能,能够帮助开发者更好的创建和分发python包。大部分python用户都会使用更先进的setuptools模块。
setuptools有一个fork分支是distribute。它们共享相同的命名空间,因此如果安装了distribute,import setuptools时实际上将导入使用distribute创建的包。Distribute已经合并回setuptools。
还有一个大包分发工具是distutils2,其试图尝试充分利用distutils,setuptools和distribute并成为python标准库中的标准工具。但该计划并没有达到预期的目的,且已经是一个废弃的项目。
因此setuptools是一个优秀的,可靠的python包安装与分发工具。以下设计到包的安装与分发均针对setuptools,并不保证distutils可用。
- 包格式
python库打包的格式包括wheel和egg。egg格式是由setuptools在2004年引入,而wheel格式是由PEP427在2012年定义。使用wheel和egg安装都不需要重新构建和编译,其在发布之前就应该完成测试和构建。
egg和wheel本质上都是一个zip格式包,egg文件使用.egg扩展名,wheel使用.whl扩展名。wheel的出现是为了替代egg,其现在被认为是python的二进制包的标准格式。
以下是wheel和egg的主要区别:
wheel有一个官方的PEP427来定义,而egg没有PEP定义
wheel是一种分发格式,即打包格式。而egg既是一种分发格式,也是一种运行时安装的格式,并且是可以被直接import
wheel文件不会包含.pyc文件
wheel使用和PEP376兼容的.dist-info目录,而egg使用.egg-info目录
wheel有着更丰富的命名规则。
wheel是有版本的。每个wheel文件都包含wheel规范的版本和打包的实现
wheel在内部被sysconfig path type管理,因此转向其他格式也更容易
- setup.py文件
python库打包分发的关键在于编写setup.py文件。setup.py文件编写的规则是从setuptools或者distuils模块导入setup函数,并传入各类参数进行调用。
from setuptools import setup
# or
# from distutils.core import setup

setup(
        name='demo',     # 包名字
        version='1.0',   # 包版本
        description='This is a test of the setup',   # 简单描述
        author='huoty',  # 作者
        author_email='sudohuoty@163.com',  # 作者邮箱
        url='https://www.konghy.com',      # 包的主页
        packages=['demo'],                 # 包
)
setup函数常用的参数如下:
| 参数 | 说明 |
|---|---|
name |
包名称 |
version |
包版本 |
author |
程序的作者 |
author_email |
程序的作者的邮箱地址 |
maintainer |
维护者 |
maintainer_email |
维护者的邮箱地址 |
url |
程序的官网地址 |
license |
程序的授权信息 |
description |
程序的简单描述 |
long_description |
程序的详细描述 |
platforms |
程序适用的软件平台列表 |
classifiers |
程序的所属分类列表 |
keywords |
程序的关键字列表 |
packages |
需要处理的包目录(通常为包含__init__.py的文件夹) |
py_modules |
需要打包的python单文件列表 |
download_url |
程序的下载地址 |
cmdclass |
添加自定义命令 |
package_data |
指定包内需要包含的数据文件 |
include_package_data |
自动包含包内所有受版本控制(cvs/svn/git)的数据文件 |
exclude_package_data |
当include_package_data为True时该选项用于排除部分文件 |
data_files |
打包时需要打包的数据文件,如图片、配置文件等 |
ext_modules |
指定扩展模块 |
scripts |
指定可执行脚本,安装时脚本会被安装到系统PATH路径下 |
package_dir |
指定哪些目录下的文件被映射到哪个源码包 |
requires |
指定依赖的其他包 |
provides |
指定可以为哪些模块提供依赖 |
install_requires |
安装时需要安装的依赖包 |
entry_points |
动态发现服务和插件,下面详细讲 |
setup_requires |
指定运行setup.py文件本身所依赖的包 |
dependency_links |
指定依赖包的下载地址 |
extras_require |
当前包的高级/额外特性需要依赖的分发包 |
zip_safe |
不压缩包,而是以目录的形式安装 |
更多参数可见: https://setuptools.readthedocs.io/en/latest/setuptools.html
find_packages: 对于简单工程来说,手动增加packages参数是容易。而对于复杂的工程来说,可能添加很多的包,这是手动添加就变得麻烦。setuptools模块提供了一个find_packages函数,它默认在与setup.py文件同一目录下搜索各个含有__init__.py的目录做为要添加的包。
find_packages(where='.', exclude=(), include=('*',))
find_packages函数的第一个参数用于指定在哪个目录下搜索包,参数exclude用于指定排除哪些包,参数include指出要包含的包。
默认默认情况下setup.py文件只在其所在的目录下搜索包。如果不用find_packages,想要找到其他目录下的包,也可以设置package_dir参数,其指定哪些目录下的文件被映射到哪个源码包,如:package_dir={'': 'src'}表示"root package"中的模块都在src目录中。
- 包含数据文件
package_data: 该参数是一个从包名称到glob模式列表的字典。如果数据文件包含在包的子目录中,则glob可以包括子目录名称。其格式一般为{'package_name': ['files']},比如:package_data={'mypkg': ['data/*.dat'],}。
include_package_data: 该参数被设置为True时自动添加包中受版本控制的数据文件,可替代package_data,同时exclude_package_data可以排除某些文件。注意当需要加入没有被版本控制的文件时,还是仍然需要使用package_data参数才行。
data_files: 该参数通常用于包含不在包内的数据文件,即包的外部文件,如:配置文件,消息目录,数据文件。其指定了一系列二元组,即(目的安装目录、源文件),表示哪些文件被安装到哪些目录中。如果目录名是相对路径,则相对于安装前缀进行解释。
manifest template: manifest template即编写MANIFEST.in文件,文件内容就是需要包含在分发包中的文件。一个MANIFEST.in文件如下:
include *.txt
recursive-include examples *.txt *.py
prune examples/sample?/build
MANIFEST.in文件的编写规则可参考:https://docs.python.org/3.6/distutils/sourcedist.html
- 生成脚本
有两个参数scripts参数或console_scripts可用于生成脚本。
entry_points参数用来支持自动生成脚本,其值应该为是一个字典,从entry_point组名映射到一个表示entry_point的字符串或字符串列表,如:
setup(
    # other arguments here...
    entry_points={
        'console_scripts': [
            'foo=foo.entry:main',
            'bar=foo.entry:main',
        ],
    }
)
scripts参数是一个list,安装包时在该参数中列出的文件会被安装到系统PATH路径下。如:
scripts=['bin/foo.sh', 'bar.py']
用如下方法可以将脚本重命名,例如去掉脚本文件的扩展名(.py、.sh):
from setuptools.command.install_scripts import install_scripts

class InstallScripts(install_scripts):

    def run(self):
        setuptools.command.install_scripts.install_scripts.run(self)

        # Rename some script files
        for script in self.get_outputs():
            if basename.endswith(".py") or basename.endswith(".sh"):
                dest = script[:-3]
            else:
                continue
            print("moving %s to %s" % (script, dest))
            shutil.move(script, dest)

setup(
    # other arguments here...
    cmdclass={
        "install_scripts": InstallScripts
    }
)
其中,cmdclass参数表示自定制命令,后文详述。
ext_modules
ext_modules参数用于构建C和C++扩展扩展包。其是Extension实例的列表,每一个Extension实例描述了一个独立的扩展模块,扩展模块可以设置扩展包名,头文件、源文件、链接库及其路径、宏定义和编辑参数等。如:
setup(
    # other arguments here...
    ext_modules=[
        Extension('foo',
                  glob(path.join(here, 'src', '*.c')),
                  libraries = [ 'rt' ],
                  include_dirs=[numpy.get_include()])
    ]
)
详细了解可参考:https://docs.python.org/3.6/distutils/setupscript.html#preprocessor-options
zip_safe
zip_safe参数决定包是否作为一个zip压缩后的egg文件安装,还是作为一个以.egg结尾的目录安装。因为有些工具不支持zip压缩文件,而且压缩后的包也不方便调试,所以建议将其设为False,即zip_safe=False。
- 自定义命令
setup.py文件有很多内置的的命令,可以使用python setup.py --help-commands查看。如果想要定制自己需要的命令,可以添加cmdclass参数,其值为一个dict。实现自定义命名需要继承setuptools.Command或者distutils.core.Command并重写run方法。
from setuptools import setup, Command

class InstallCommand(Command):
    description = "Installs the foo."
    user_options = [
        ('foo=', None, 'Specify the foo to bar.'),
    ]
    def initialize_options(self):
        self.foo = None
    def finalize_options(self):
        assert self.foo in (None, 'myFoo', 'myFoo2'), 'Invalid foo!'
    def run(self):
        install_all_the_things()

setup(
    ...,
    cmdclass={
        'install': InstallCommand,
    }
)
- 依赖关系
如果包依赖其他的包,可以指定install_requires参数,其值为一个list,如:
install_requires=[
    'requests>=1.0',
    'flask>=1.0'
]
指定该参数后,在安装包时会自定从pypi仓库中下载指定的依赖包安装。
此外,还支持从指定链接下载依赖,即指定dependency_links参数,如:
dependency_links = [
    "http://packages.example.com/snapshots/foo-1.0.tar.gz",
    "http://example2.com/p/bar-1.0.tar.gz",
]
- 分类信息
classifiers参数说明包的分类信息。所有支持的分类列表见:https://pypi.org/pypi?%3Aaction=list_classifiers。示例:
classifiers = [
    # 发展时期,常见的如下
    #   3 - Alpha
    #   4 - Beta
    #   5 - Production/Stable
    'Development Status :: 3 - Alpha',

    # 开发的目标用户
    'Intended Audience :: Developers',

    # 属于什么类型
    'Topic :: Software Development :: Build Tools',

    # 许可证信息
    'License :: OSI Approved :: MIT License',

    # 目标 Python 版本
    'Programming Language :: Python :: 2',
    'Programming Language :: Python :: 2.7',
    'Programming Language :: Python :: 3',
    'Programming Language :: Python :: 3.3',
    'Programming Language :: Python :: 3.4',
    'Programming Language :: Python :: 3.5',
]
setup.py命令
setup.py文件有很多内置命令可供使用,查看所有支持的命令:
python setup.py --help-commands
此处列举一些常用命令:
build:构建安装时所需的所有内容- ·sdist·:构建源码分发包,在Windows下为zip格式,Linux下为tag.gz格式。执行sdist命令时,默认会被打包的文件:
- 所有
py_modules或packages指定的源码文件- 所有
ext_modules指定的文件- 所有
package_data或data_files指定的文件- 所有
scripts指定的脚本文件README、README.txt、setup.py和setup.cfg文件
该命令构建的包主要用于发布,例如上传到pypi上。
bdist:构建一个二进制的分发包。bdist_egg: 构建一个egg分发包,经常用来替代基于bdist生成的模式install:安装包到系统环境中。develop:以开发方式安装包,该命名不会真正的安装包,而是在系统环境中创建一个软链接指向包实际所在目录。这边在修改包之后不用再安装就能生效,便于调试。register、upload:用于包的上传发布,后文详述。
setup.cfg文件:setup.cfg文件用于提供setup.py的默认参数,详细的书写规则可参考:https://docs.python.org/3/distutils/configfile.html
版本命名:包版本的命名格式应为如下形式:
N.N[.N]+[{a|b|c|rc}N[.N]+][.postN][.devN]
从左向右做一个简单的解释:
- "N.N": 必须的部分,两个"N"分别代表了主版本和副版本号
- "[.N]": 次要版本号,可以有零或多个
- "{a|b|c|rc}": 阶段代号,可选a,b,c,rc分别代表alpha,beta,candidate和release candidate
- "N[.N]": 阶段版本号,如果提供,则至少有一位主版本号,后面可以加无限多位的副版本号
- ".postN": 发行后更新版本号,可选
- ".devN": 开发期间的发行版本号,可选
easy_install与pip
easy_insall是setuptool包提供的第三方包安装工具,而pip是python中一个功能完备的包管理工具,是easy_install的改进版,提供更好的提示信息,删除包等功能。
pip相对于easy_install进行了以下几个方面的改进:
- 所有的包是在安装之前就下载了,所以不可能出现只安装了一部分的情况
- 在终端上的输出更加友好
- 对于动作的原因进行持续的跟踪。例如,如果一个包正在安装,那么pip就会跟踪为什么这个包会被安装
- 错误信息会非常有用
- 代码简洁精悍可以很好的编程
- 不必作为egg存档,能扁平化安装(仍然保存egg元数据)
- 原生的支持其他版本控制系统(Git,Mercurial and Bazaar)
- 加入卸载包功能
- 可以简单的定义修改一系列的安装依赖,还可以可靠的赋值一系列依赖包
- 发布包
PyPI(Python Package Index)是python官方维护的第三方包仓库,用于统一存储和管理开发者发布的python包。
如果要发布自己的包,需要先到pypi上注册账号。然后创建~/.pypirc文件,此文件中配置PyPI访问地址和账号。如的.pypirc文件内容请根据自己的账号来修改。
典型的.pypirc文件
[distutils]
index-servers = pypi

[pypi]
username:xxx
password:xxx
接着注册项目: python setup.py register
该命令在PyPi上注册项目信息,成功注册之后,可以在PyPi上看到项目信息。最后构建源码包发布即可:python setup.py sdist upload
1.2 python与c参考手册
应用程序程序员的python接口使C和C++程序员可以在各种级别访问python解释器。API可以与C++同等地使用,但为了简洁起见,它通常被称为python/C API。使用python/C API有两个根本不同的原因。第一个原因是为特定目的写扩展模块;这些是扩展python解释器的C模块。这可能是最常用的。第二个原因是使用python作为大型应用程序中的一个组件;这种技术通常被称为嵌入pythonin一个应用程序.
编写扩展模块是一个相对容易理解的过程,其中"烹饪书"方法很有效。有几种工具可以在一定程度上自动化过程。虽然人们在早期存在的过程中将python嵌入到其他应用程序中,但嵌入python的过程并不比编写扩展程序简单得多.
许多API函数都是有用的,无论你是否嵌入了原始python;此外,大多数嵌入python的应用程序也需要提供自定义扩展,因此在尝试将python嵌入到重新应用之前熟悉编写扩展可能是个好主意.
1.2.1 基础使用
python可以非常方便地和C进行相互的调用,一般,我们不会使用C去直接编写一个python的模块。通常的情景是我们需要把C的相关模块包装一下,然后在python中可以直接调用它。或者是,把python逻辑中的某一效率要求很高的部分使用C来实现。整个过程大概是:
- 引入
python.h头文件- 编写包装函数
- 函数中处理从python传入的参数
- 实现功能逻辑
- 处理C中的返回值,包装成python对象
- 在一个PyMethodDef结构体中注册需要的函数。
- 在一个初始化方法中注册模块名。
- 把这个C源文件编译成链接库。
int add(int x, int y){
    return x + y;
}

// int main(void){
//     printf("%d", add(1, 2));
//     return 0;
// }

#include<python.h>    // 引入python.h头文件,在/usr/include/python*目录

// 编写包装函数
// 包装函数一般声明成static,并且第一个参数是一个默认传入的python对象,就是python中某个对象的属性方法一样,第二个参数才是我们调用时传入的参数
static PyObject* W_add(PyObject* self, PyObject* args){
    int x;
    int y;
    // 出入传入参数:常用的函数PyArg_ParseTuple
    if(!PyArg_ParseTuple(args, "i|i", &x, &y)){
        return NULL;
    } else {
        // 处理C中的返回值,常用的函数Py_BuildValue
        return Py_BuildValue("i", add(x, y));
    }
}

//  注册函数
//  PyMethodDef列表中结构体成员有四个函数:
//      "add"导出后在pyhton中可见的方法名。
//      W_add实际映射到C中的方法名。
//      METH_VARARGS表示传入方法的是普通参数,当然还可以处理关键词参数。
//      此方法的注释。
static PyMethodDef ExtendMethods[] = {
    {"add", W_add, METH_VARARGS, "a function from C"},
    {NULL, NULL, 0, NULL},
};

//  注册模块
//      方法名必须是init加上模块名,然后调用Py_InitModule来注册模块,
//      这个函数的第一个参数就是模块名,第二个参数是此模块中我们导出的方法,就是上一步定义的结构体
PyMODINIT_FUNC initdemo(){
    Py_InitModule("demo", ExtendMethods);
}
编译和使用: gcc demo.c -I /usr/include/python2.6 -shared -o demo.so,使用模块:
import demo
demo.add(3, 4)
1.2.2 编码标准
如果您正在编写包含在Cpython中的C代码,那么你必须遵循PEP 7。这些指南适用于您所贡献的python版本。除非你最终希望将它们贡献给python,否则你的第三方扩展模块不需要遵循这些约定.
- 包含文件
使用python所需的所有函数,类型和宏定义C API包含在您的代码中,如下所示:
#include"python.h"
这意味着包含以下标准标题:<stdio.h>,<string.h>,<errno.h>,<limits.h>,<assert.h>和<stdlib.h>(如果可用).
注意:
- 由于python可能会定义一些影响某些系统上标准头的预处理器定义,所以在包含任何标准头之前你must包含python.h
- python.h定义的所有用户可见名称(包括标准头文件定义的除外)都有一个前缀Py或_Py。以_Py开头的名称供python实现内部使用,不应由扩展编写者使用。结构成员名称没有保留前缀.
- 重要的用户代码永远不应该定义以Py或_Py开头的名称。这会使读者感到困惑,并危及用户代码对未来python版本的可移植性,这些版本可能会定义以这些前缀之一开头的其他名称.
- 头文件通常与python一起安装。在Unix上,它们位于
prefix/include/pythonversion/和exec_prefix/include/pythonversion/目录中,其中prefix和exec_prefix由python的相应参数定义配置脚本和version是"%d.%d"%sys.version_info[:2]。在Windows上,标题安装在prefix/include中,其中prefix是指定给安装程序的安装目录.- 要包含标题,请将两个目录(如果不同)放在编译器上包含的搜索路径。做not将父目录放在搜索路径上,然后使用
#include<pythonX.Y/python.h>;这将打破多平台构建,因为prefix下面的平台独立头包含来自exec_prefix.- C++用户应该注意,尽管API完全使用C定义,但是头文件正确地将入口点声明为extern"C",因此不需要做任何特殊的事情来使用C++中的API.
- 有用的宏
python头文件中定义了几个有用的宏。许多被定义为更接近它们有用的地方(例如Py_RETURN_NONE)。这里定义了更通用的其他实用程序。这不一定是完整的列表.
Py_UNREACHABLE():当你有一个你不希望达到的代码路径时使用这个。例如,在default:声明switch声明中有关可能的值的声明包含在case声明中。在你可能想要放置assert(0)或abort()来电的地方使用它Py_ABS(x):返回x的绝对值。Py_MIN(x,y):返回x和y之间的最小值Py_MAX(x,y): 返回x和y之间的最大值Py_STRINGIFY(x):将x转换为C字符串。例如Py_STRINGIFY(123)返回"123".Py_MEMBER_SIZE(type,member):返回大小一个结构(type) member以字节为单位Py_CHARMASK(c):参数必须是[-128,127]或[0,255]范围内的字符或整数。这个宏返回c施放到unsigned char.Py_GETENV(s):就像getenv(s),但是返回NULL如果-E在命令行上传递(即如果设置了Py_IgnoreEnvironmentFlag).Py_UNUSED(arg):将此用于函数定义中未使用的参数,以使编译警告静音,例如PyObject*func(PyObject*Py_UNUSED(ignored)).
- 类型和引用计数
大多数python/C API函数都有一个或多个参数以及类型的返回值PyObject *。此类型是指向表示任意python对象的不透明数据类型的指针。由于在大多数情况下(例如赋值,范围规则和参数传递),python语言都以相同的方式处理所有python对象类型,因此它们应该由单个C类型表示。几乎所有python对象都存在于堆中:你永远不会声明类型为PyObject,只能声明PyObject *类型的指针变量。唯一的例外是类型对象;因为它们绝对不能被分配,所以它们通常是静态的PyTypeObject对象.
所有python对象(甚至python整数)都有type和referencecount。对象的类型确定它是什么类型的对象(例如,整数,列表或用户定义的函数;还有更多的问题在中标准类型层次结构)。对于每个众所周知的类型,都有一个macroto检查对象是否属于该类型;例如,PyList_Check(a) is true if(且仅当)a指向的对象是一个python列表.
引用计数
引用计数很重要因为今天的计算机有一个有限的(并且是严重限制)内存大小;它计算有多少不同的地方有一个对象的引用。这样的位置可以是另一个对象,或全局(或静态)C变量,或某个C函数中的局部变量。当对象的引用计数变为零时,该对象将被释放。If it包含对其他对象的引用,它们的引用计数递减。如果此递减使其引用计数变为零,则可以依次释放其他对象,依此类推。(这里有一个明显的问题,对象在这里相互引用;现在,解决方案是“不要用do that。”)
引用计数总是被明确地操作。通常的方法是使用宏Py_INCREF()将对象的引用计数增加1,并使用Py_DECREF()将其减1。Py_DECREF()macrois比incrementf要复杂得多,因为它必须检查引用计数是否为零然后导致对象的解除分配器被置换。deallocator是包含在对象的类型结构中的函数指针。特定于类型的解除分配器负责减少对象中包含的其他对象的干扰计数(如果这是复合对象类型,例如列表),以及执行所需的任何其他完成。引用计数不可能溢出;由于虚拟内存中存在明显的内存位置(假设sizeof(Py_ssize_t)>=sizeof(void*)),因此至少会使用多少位来保存引用计数。因此,引用计数增量是一个简单的操作.
没有必要为包含指向对象的指针的每个局部变量递增对象的引用计数。从理论上讲,当变量指向它时,对象的引用计数增加1,当变量超出范围时,它会减1。但是,这些两个相互出来,所以最后引用计数没有改变。使用引用计数的唯一真正原因是,只要我们的变量指向它,就可以防止对象被释放。如果我们知道至少有一个对该对象的引用至少和变量一样长,那么就不需要临时增加引用计数。出现这种情况的一个重要情况是在向C函数传递参数的对象中。一个从python调用的扩展模块;调用机制保证保存对每个参数的引用以便调用该调用.
但是,常见的缺陷是从列表中提取对象并保持一段时间而不增加其引用计数。其他一些操作可能会从列表中删除该对象,减少其引用计数并可能解除分配。真正的危险是,无辜的操作可能会调用可以执行此操作的任意python代码;有一个代码路径,允许控件从回流到用户Py_DECREF()最重要的是任何操作都有潜在危险.
一种安全的方法是始终使用泛型操作(namebegins与PyObject_,PyNumber_,PySequence_要么PyMapping_这些操作总是增加它们返回的对象的引用计数。这使得调用者有责任调用Py_DECREF()当他们完成结果;这很快成为第二天性.
引用计数详细信息
python/C API中函数的引用计数行为最好用ownership of references。所有权属于引用,never to对象(对象不归属于:它们始终是共享的)。“拥有参考”意味着当不再需要参考时负责在其上调用Py_DECREF。所有权也可以被转移,这意味着接受参考所有权的代码然后通过在不再需要时调用Py_DECREF()或Py_XDECREF()或者传递这一责任而成为负责人,从而降低它的负担(通常是它的召唤者)。当函数将引用的所有权传递给其调用者时,调用者被称为接收new引用。当没有所有权转移时,呼叫者被称为borrow参考。没有什么需要为明天的引用而做.
相反,当一个调用函数传入一个对象的引用时,有两种可能性:函数steals对象的引用,或者它不是。Stealingareference表示当你传递一个函数的引用时,该函数假定它现在拥有该引用,并且你不再对它负责.
很少有函数窃取引用;这两个值得注意的例外是PyList_SetItem()和PyTuple_SetItem(),它们窃取了对项目的引用(但不是对项目所放置的元组或列表!)。这些函数被设计为窃取引用,因为有一个常见的习惯用于使用新创建的对象来填充元组或列表;例如,代码创建元组(1,2,"three")可能看起来像这样(暂时忘记abouterror处理;更好的编码方式如下所示):
PyObject *t;t = PyTuple_New(3);
PyTuple_SetItem(t, 0, PyLong_FromLong(1L));
PyTuple_SetItem(t, 1, PyLong_FromLong(2L));
PyTuple_SetItem(t, 2, PyUnicode_FromString("three"));
这里,PyLong_FromLong()返回一个新的引用,它被PyTuple_SetItem()立即删除。当你想继续使用一个对象时,对它的引用会被盗,在调用引用窃取函数之前使用Py_INCREF()来指示其他参考.
偶然的,PyTuple_SetItem()是only设置元组项目的方式;PySequence_SetItem()和PyObject_SetItem()拒绝这样做,因为元组是一个不可变的数据类型。您应该只使用PyTuple_SetItem()来创建自己创建的元组.
用于填充列表的等效代码可以使用PyList_New()和PyList_SetItem().
编写但是,在实践中,您很少会使用这些方法来创建和填充元组或列表。有一个通用函数,Py_BuildValue(),它可以用format string指定从C值创建大多数常见对象。例如,上面两个代码块可以用以下代码替换(也需要关心错误检查):
PyObject *tuple, *list;
tuple = Py_BuildValue("(iis)", 1, 2, "three");
list = Py_BuildValue("[iis]", 1, 2, "three");
更常见的是使用PyObject_SetItem()和朋友的项目,这些项目只是你借用的参考文献,就像你正在编写的函数中传递的参数一样。在这种情况下,他们对参考计数的行为更加明智,因为您不必增加引用计数,因此您可以提供参考(“让它被盗”)。例如,此函数将列表中的所有项(实际上是任何可变序列)设置为给定项:
intset_all(PyObject *target, PyObject *item){
    Py_ssize_t i, n;
    n = PyObject_Length(target);
    if (n < 0)
        return -1;
    for (i = 0; i < n; i++) {
        PyObject *index = PyLong_FromSsize_t(i);
        if (!index)
            return -1;
        if (PyObject_SetItem(target, index, item) < 0) {
            Py_DECREF(index);
            return -1;
        }
        Py_DECREF(index);
    }
    return 0;
}
函数返回值的情况略有不同。虽然传递对大多数函数的引用并不会更改对该引用的所有权责任,但许多返回对对象引用的函数都会给您引用的所有权。原因很简单:在很多情况下,动态创建了对象,您获得的引用是对象的唯一引用。因此,返回对象引用的泛型函数,如PyObject_GetItem()和PySequence_GetItem(),总是返回一个新的引用(调用者成为引用的所有者).
重要的是意识到你是否拥有一个由函数返回的引用取决于你只调用哪个函数–theplumage(作为参数传递给函数的对象的类型)doesn’tenterintoit!因此,如果你提取一个项目从使用PyList_GetItem()的列表中,你不拥有引用–但如果你使用PySequence_GetItem()(它恰好采用完全相同的参数),你拥有对返回对象的引用.
下面是一个示例,说明如何编写一个函数来计算整数列表中项目的总和;一次使用PyList_GetItem(),一次使用PySequence_GetItem().
longsum_list(PyObject *list){
    Py_ssize_t i, n;
    long total = 0, value;
    PyObject *item;
    n = PyList_Size(list);
    if (n < 0)
        return -1;
 /* Not a list */
    for (i = 0; i < n; i++) {
        item = PyList_GetItem(list, i);
 /* Can"t fail */
        if (!PyLong_Check(item)) continue;
 /* Skip non-integers */
        value = PyLong_AsLong(item);
        if (value == -1 && PyErr_Occurred())
            /* Integer too big to fit in a C long, bail out */
            return -1;
        total += value;
    }
    return total;
}

longsum_sequence(PyObject *sequence){
    Py_ssize_t i, n;
    long total = 0, value;
    PyObject *item;
    n = PySequence_Length(sequence);
    if (n < 0)
        return -1;
    /* Has no length */
    for (i = 0; i < n; i++) {
        item = PySequence_GetItem(sequence, i);
        if (item == NULL)
            return -1;
    /* Not a sequence, or other failure */
        if (PyLong_Check(item)) {
            value = PyLong_AsLong(item);
            Py_DECREF(item);
            if (value == -1 && PyErr_Occurred())
                /* Integer too big to fit in a C long, bail out */
                return -1;
            total += value;
        }
        else {
            Py_DECREF(item); /* Discard reference ownership */
        }
    }
    return total;
}
类型
很少有其他数据类型在python/C API中发挥重要作用;大多数是简单的C类型,如int,long,double和char*。一些结构类型用于描述用于列出模块导出的函数的静态表或新对象类型的数据属性,另一种用于描述复数的值。这些将与使用它们的功能一起讨论.
例外,如果需要特定的错误处理,python程序员只需要处理异常;未处理的异常会自动传播给调用者,然后传递给调用者的调用者,依此类推,直到他们到达顶级解释器,然后将它们报告给用户并伴随stacktraceback.
然而,对于C程序员来说,错误检查总是必须明确。python/CAPI中的所有函数都可以引发异常,除非在函数文档中另有明确声明。通常,当函数发生错误时,它会设置异常,丢弃所拥有的任何对象引用,并返回错误指示符。如果没有另外说明,则该指示符是NULL或-1,具体取决于函数的返回类型。一些函数返回布尔值true/false结果,false表示错误。很少有函数返回没有明确的错误指示符或具有不明确的返回值,并且需要使用PyErr_Occurred()。始终明确记录这些异常.
在每线程存储中维护异常状态(这相当于在无线程应用程序中存储全局存储)。线程可以处于以下两种状态之一:发生了异常,或者没有。函数PyErr_Occurred()可用于检查:当发生异常时,它返回对异常类型对象的借用引用,否则返回NULL。有许多函数可以设置异常状态:PyErr_SetString()是设置异常状态最常见的(虽然不是最常用的)函数,而PyErr_Clear()清除异常状态.
完整异常状态由三个对象组成(所有对象都可以是NULL):异常类型,相应的异常值和跟踪。这些与sys.exc_info()的python结果具有相同的含义;然而,它们并不相同:python对象代表python处理的最后一个异常try…except语句,而C级异常状态只存在,而C函数之间传递异常,直到它到达pythonbytecode解释器的主循环,它负责将它传递给sys.exc_info()和friends.
请注意,从python1.5开始,从python代码访问异常状态的首选,线程安全方法是调用函数sys.exc_info(),它返回python代码的每线程异常状态。此外,访问异常状态的两种方法的这些语法已经改变,因此捕获异常的功能将保存并恢复其线程的异常状态,以便保留其调用者的异常状态。这可以防止异常处理代码中的commonbugs由一个无辜的函数覆盖正在处理的异常;它还减少了由追踪中的堆栈帧引用的对象经常不需要的生命周期扩展.
作为一般原则,调用另一个函数来执行某个任务的函数应检查被调用函数是否引发异常,如果是,则将异常状态传递给其调用者。它应该丢弃它拥有的任何对象引用,并返回一个错误指示符,但它应该notsetanother异常–它将覆盖刚刚引发的异常,并丢失有关错误确切原因的重要信息.
在sum_sequence()上面的例子。碰巧这个例子在检测到错误时不需要清理任何拥有的引用。followingexample函数显示了一些错误清理。首先,为了提醒你为什么喜欢python,我们展示了相应的python代码:
def incr_item(dict, key):
    try:
        item = dict[key]
    except KeyError:
        item = 0
    dict[key] = item + 1
这是相应的C代码,它的所有荣耀:
intincr_item(PyObject *dict, PyObject *key){
    /* Objects all initialized to NULL for Py_XDECREF */
    PyObject *item = NULL, *const_one = NULL, *incremented_item = NULL;
    int rv = -1; /* Return value initialized to -1 (failure) */
    item = PyObject_GetItem(dict, key);
    if (item == NULL) {
        /* Handle KeyError only: */
        if (!PyErr_ExceptionMatches(PyExc_KeyError))
            goto error;
        /* Clear the error and use zero: */
        PyErr_Clear();
        item = PyLong_FromLong(0L);
        if (item == NULL)
            goto error;
    }
    const_one = PyLong_FromLong(1L);
    if (const_one == NULL)
        goto error;
    incremented_item = PyNumber_Add(item, const_one);
    if (incremented_item == NULL)
        goto error;
    if (PyObject_SetItem(dict, key, incremented_item) < 0)
        goto error;
    rv = 0; /* Success */
    /* Continue with cleanup code */
 error:
    /* Cleanup code, shared by success and failure path */
    /* Use Py_XDECREF() to ignore NULL references */
    Py_XDECREF(item);
    Py_XDECREF(const_one);
    Py_XDECREF(incremented_item);
    return rv;
 /* -1 for error, 0 for success */
}
这个例子代表了gotoC中的陈述!它说明了PyErr_ExceptionMatches()和PyErr_Clear()处理特定异常,并使用Py_XDECREF()处理可能是NULL的所有引用(注意名称中的"X";Py_DECREF()会崩溃当遇到NULL参考时)。重要的是,用于保存所有参考的变量被初始化为NULL以使其起作用;同样,建议的返回值初始化为-1(失败),并且只有在最终调用成功后才能成功.
1.2.3 嵌入python
只有嵌入器的一项重要任务(而不是扩展编写者)python解释器必须担心的是python解释器的初始化,可能还有最终化。解释器的大多数功能只能在解释器初始化后才能使用.
基本初始化函数是Py_Initialize()。这初始化了已加载模块的表,并创建了基本模块builtins,__main__和sys。它还初始化模块搜索路径(sys.path).
Py_Initialize()没有设置“脚本参数列表”(sys.argv)。如果以后执行的python代码需要这个变量,那么在调用之后必须通过调用PySys_SetArgvEx(argc,argv,updatepath)显式设置它。Py_Initialize().
在大多数系统上(特别是在Unix和Windows上,尽管细节略有不同),Py_Initialize()基于对标准pythoninterpreterexecutable位置的最佳猜测来计算模块搜索路径,假设python库位于与python解释器可执行文件相关的固定位置。特别是,它寻找名为lib/pythonX.Y相对于名为python在shell命令searchpath中找到(环境变量PATH).
例如,如果在/usr/local/bin/python,它会假设库在/usr/local/lib/pythonX.Y。(事实上,这个特殊的路径也是“后备”位置,在没有名为python发现PATH。)用户可以通过设置环境变量PYTHONHOME来覆盖此行为,或者通过设置PYTHONPATH.
嵌入应用程序可以通过调用Py_SetProgramName(file) before调用Py_Initialize()来引导搜索。注意PYTHONHOME仍然覆盖了这个和PYTHONPATH仍然插在标准路径的前面。需要全面控制的应用程序必须提供自己的Py_GetPath(),Py_GetPrefix(),Py_GetExecPrefix()和Py_GetProgramFullPath()的实现(全部在Modules/getpath.c中定义.
有时,需要“取消初始化”python。例如,应用程序可能要重新开始(再次调用Py_Initialize()或者应用程序只是通过使用python来完成,并希望释放python分配的内存。这可以通过调用Py_FinalizeEx()来完成。功能Py_IsInitialized()如果python当前处于初始化状态,则返回returntrue。有关这些功能的更多信息将在后面的章节中给出。注意Py_FinalizeEx()做not释放python解释器分配的所有内存,例如:目前无法释放由扩展模块分配的内存.
更高的参考:https://www.itbook5.com/2019/02/10984/
二、基本模块
2.1 psutil模块
psutil是个跨平台库,能够轻松实现获取系统运行的进程和系统利用率,包括CPU、内存、磁盘、网络等信息。它主要应用于信息监控,分析和限制系统资源及进程的管理。它实现了同等命令命令行工具提供的功能,如:ps、top、lsof、netstat、ifconfig、who、df、kill、free、nice、ionice、iostat、iotop、uptime、pidof、tty、taskset、pmap等。目前支持32位和64位的linux、windows、OS X、FreeBSD和Sun Solaris等操作系统。
- 获取
CPU信息
psutil.cpu_times(percpu=False)  #查看CPU所有信息
# scputimes(user=306.98, nice=2.01, system=337.34, idle=410414.39, iowait=78.37, irq=0.0, softirq=17.42, steal=0.0, guest=0.0, guest_nice=0.0)
#   user:用户进程花费的时间
#   nice:用户模式执行Niced优先级进程花费的时间
#   system:内核模式进程花费的时间
#   idle:闲置时间
#   iowait:等待I/O完成的时间
#   irq:处理硬件中断的时间
#   softirq:处理软件中断的时间
#   steal:虚拟化环境中运行的其他操作系统花费的时间
#   guest:在linux内核的控制下为客户端操作系统运行虚拟CPU所花费的时间
#   guest_nice:虚拟机运行niced所花费的时间


psutil.cpu_times(percpu=True)  #显示所有CPU逻辑信息
# [scputimes(user=56676.49, nice=0.0, system=38614.3, idle=431441.25),
#  scputimes(user=20572.6, nice=0.0, system=10738.09, idle=495404.12),
#  scputimes(user=55527.28, nice=0.0, system=27354.65, idle=443833.23),
#  scputimes(user=18629.33, nice=0.0, system=8379.76, idle=499705.7)]

psutil.cpu_times().user  # 显示用户占CPU的时间比
# 151413.85

psutil.cpu_count(logical=True)  # 显示CPU逻辑个数
# 4

psutil.cpu_count(logical=False)  #显示CPU物理个数
# 4

psutil.cpu_stats()    # CPU统计信息
# scpustats(ctx_switches=30475, interrupts=694164, soft_interrupts=846899249, syscalls=491839)
#   ctx_switches:启动后的上下问切换次数
#   interrupts:自启动以来的中断次数
#   soft_interrupts:启动后的软件中断数量
#   syscalls:启动以来的系统调用次数,在linux上始终为0
- 内存信息
psutil.virtual_memory()以字节返回内存使用情况的统计信息
mem = psutil.virtual_memory()  # 获取内存完整信息
mem
# svmem(total=8589934592, available=2228961280, percent=74.1, used=4871819264, free=34856960, active=2194817024, inactive=2111557632, wired=2677002240)
#   total:总物理内存
#   available:可用的内存
#   used:使用的内存
#   free:完全没有使用的内存
#   active:当前正在使用的内存
#   inactive:标记为未使用的内存
#   buffers:缓存文件系统元数据使用的内存
#   cached:缓存各种文件的内存
#   shared:可以被多个进程同时访问的内存
#   slab:内核数据结构缓存的内存

mem.total   # 获取内存总数
# 8589934592

mem.used   # 获取已使用内存
# 4871819264

mem.free   # 获取空闲内存
# 34856960

psutil.swap_memory()  # 获取swap内存信息
# sswap(total=3221225472, used=1956118528, free=1265106944, percent=60.7, sin=373117317120, sout=3539480576)
#   total:以字节为单位的总交换内存
#   used:以字节为单位使用交换内存
#   free:以字节为单位的可用交换内存
#   percent:使用百分比
#   sin:系统从磁盘交换的字节数
#   sout:系统从磁盘换出的字节数
- 磁盘信息
psutil.disk_partitions(all=False):返回所有安装的磁盘分区作为名称元组的列表,包括设备,安装点和文件系统类型,类似于Unix上的'df'命令。
psutil.disk_partitions(all=False)    # 获取磁盘完整信息
# [sdiskpart(device='/dev/disk1s5', mountpoint='/', fstype='apfs', opts='ro,local,rootfs,dovolfs,journaled,multilabel'),
#  sdiskpart(device='/dev/disk1s1', mountpoint='/System/Volumes/Data', fstype='apfs', opts='rw,local,dovolfs,dontbrowse,journaled,multilabel'),
#  sdiskpart(device='/dev/disk1s4', mountpoint='/private/var/vm', fstype='apfs', opts='rw,local,dovolfs,dontbrowse,journaled,multilabel')]
psutil.disk_usage(path):将有关包含给定路径的分区的磁盘使用情况统计信息返回为指定元组,包括以字节表示的,总共,已使用和空闲的空间以及百分比使用率,如果路径存在则引发OSError。
psutil.disk_usage('/')  # 获取分区使用情况
# sdiskusage(total=250685575168, used=10994212864, free=144880254976, percent=7.1)
#   total:总的大小(字节)
#   used:已使用的大小(字节)
#   free:空闲的大小(字节)
#   percent:使用百分比
psutil.disk_io_counters(perdisk=False,nowrap=True):将系统范围的磁盘I/0统计作为命名元组返回,包括以下字段:
read_count:读取次数write_count:写入次数read_bytes:读取的字节数write_bytes:写入的字节数read_time:从磁盘读取的时间(以毫秒为单位)write_time:写入磁盘的时间(毫秒为单位)busy_time:花费在实际I/O上的时间read_merged_count:合并读取的数量write_merged_count:合并写入次数perdisk为True时返回物理磁盘相同的信息;nowrap为True它将检测并调整函数调用中的新值。
psutil.disk_io_counters(perdisk=True)  # 获取单个分区的IO信息
# {'disk0': sdiskio(read_count=17795776, write_count=10289680, read_bytes=569967538176, write_bytes=743204978688, read_time=12355382, write_time=8300453)}
- 网络信息
psutil.net_io_counters(pernic=False,nowrap=True):将系统范围的网络I/O统计信息作为命名元组返回,包括以下属性:
bytes_sent:发送的字节数bytes_recv:收到的字节数packets_sent:发送的数据包数量packets_recv:接收的数据包数量errin:接收时的错误总数errout:发送时的错误总数dropin:丢弃的传入数据包总数dripout:丢弃的传出数据包总数(在OSX和BSD上始终为0)
如果pernic为True网络接口上安装的每个网络接口返回相同的信息,nowrap为True时将检测并调整函数调用中的这些数字,将旧值添加到新值,保证返回的数字将增加或不变,但不减少,net_io_counters.cache_clear()可用于使nowrap缓存失效
psutil.net_io_counters(pernic=False,nowrap=True)
# snetio(bytes_sent=12010523648, bytes_recv=85769799680, packets_sent=37748129, packets_recv=68741297, errin=0, errout=0, dropin=0, dropout=0)
psutil.net_io_counters(pernic=True,nowrap=True)
# {'ens32': snetio(bytes_sent=17684066, bytes_recv=299856862, packets_sent=121275, packets_recv=335825, errin=0, errout=0, dropin=0, dropout=0),
#  'lo': snetio(bytes_sent=1812739, bytes_recv=1812739, packets_sent=2270, packets_recv=2270, errin=0, errout=0, dropin=0, dropout=0)}
psutil.net_connections(kind='inet'):返回系统范围的套接字链接,命令元组列表返回,每个命名元组提供了7个属性:
fd:套接字文件描述符。family:地址系列AF_INET,AF_INET6或AF_UNIX。type:地址类型SOCK_STREAM或SOCK_DGRAM。laddr:本地地址作为命名元组或AF_UNIX套接字的情况raddr:远程地址是指定的元组,或者是UNIX套接字的绝对地址,当远程端点未连接时,您将获得一个空元组(AF_INET *)或(AF_UNIX)status:表示TCP连接的状态。pid:打开套接字的进程的PID,如果是可检索的,否则None。在某些平台(例如Linux)上,此字段的可用性根据进程权限而变化(需要root)kind参数的值包括:inet(ipv4和ipv6),inet4(ipv4),inet6(ipv6),tcp(TCP),tcp4(TCP over ipv4),tcp6(TCP over ipv6),udp(UDP),dup4(基于ipv4的udp),cpu6(基于ipv6的udp),Unix(UNIX套接字(udp和TCP协议),all(所有可能的家庭和协议的总和)
psutil.net_connections(kind='tcp')
# [sconn(fd=3, family=<AddressFamily.AF_INET: 2>, type=<SocketKind.SOCK_STREAM: 1>, laddr=addr(ip='127.0.0.1', port=9090), raddr=(), status='LISTEN', pid=103599),
#  sconn(fd=4, family=<AddressFamily.AF_INET6: 10>, type=<SocketKind.SOCK_STREAM: 1>, laddr=addr(ip='::', port=22), raddr=(), status='LISTEN', pid=1179),
#  sconn(fd=13, family=<AddressFamily.AF_INET: 2>, type=<SocketKind.SOCK_STREAM: 1>, laddr=addr(ip='127.0.0.1', port=25), raddr=(), status='LISTEN', pid=1279),
#  sconn(fd=10, family=<AddressFamily.AF_INET: 2>, type=<SocketKind.SOCK_STREAM: 1>, laddr=addr(ip='0.0.0.0', port=3306), raddr=(), status='LISTEN', pid=70099),
#  sconn(fd=3, family=<AddressFamily.AF_INET: 2>, type=<SocketKind.SOCK_STREAM: 1>, laddr=addr(ip='0.0.0.0', port=22), raddr=(), status='LISTEN', pid=1179),
#  sconn(fd=3, family=<AddressFamily.AF_INET: 2>, type=<SocketKind.SOCK_STREAM: 1>, laddr=addr(ip='192.168.146.139', port=22), raddr=addr(ip='192.168.146.1', port=4238), status='ESTABLISHED', pid=122738),
#  sconn(fd=12, family=<AddressFamily.AF_INET: 2>, type=<SocketKind.SOCK_STREAM: 1>, laddr=addr(ip='127.0.0.1', port=9001), raddr=(), status='LISTEN', pid=103596),
#  sconn(fd=14, family=<AddressFamily.AF_INET6: 10>, type=<SocketKind.SOCK_STREAM: 1>, laddr=addr(ip='::1', port=25), raddr=(), status='LISTEN', pid=1279)]

psutil.net_connections(kind='inet4')
# [sconn(fd=3, family=<AddressFamily.AF_INET: 2>, type=<SocketKind.SOCK_STREAM: 1>, laddr=addr(ip='127.0.0.1', port=9090), raddr=(), status='LISTEN', pid=103599),
#  sconn(fd=13, family=<AddressFamily.AF_INET: 2>, type=<SocketKind.SOCK_STREAM: 1>, laddr=addr(ip='127.0.0.1', port=25), raddr=(), status='LISTEN', pid=1279),
#  sconn(fd=10, family=<AddressFamily.AF_INET: 2>, type=<SocketKind.SOCK_STREAM: 1>, laddr=addr(ip='0.0.0.0', port=3306), raddr=(), status='LISTEN', pid=70099),
#  sconn(fd=3, family=<AddressFamily.AF_INET: 2>, type=<SocketKind.SOCK_STREAM: 1>, laddr=addr(ip='0.0.0.0', port=22), raddr=(), status='LISTEN', pid=1179),
#  sconn(fd=3, family=<AddressFamily.AF_INET: 2>, type=<SocketKind.SOCK_STREAM: 1>, laddr=addr(ip='192.168.146.139', port=22), raddr=addr(ip='192.168.146.1', port=4238), status='ESTABLISHED', pid=122738),
#  sconn(fd=6, family=<AddressFamily.AF_INET: 2>, type=<SocketKind.SOCK_DGRAM: 2>, laddr=addr(ip='0.0.0.0', port=68), raddr=(), status='NONE', pid=119605),
#  sconn(fd=12, family=<AddressFamily.AF_INET: 2>, type=<SocketKind.SOCK_STREAM: 1>, laddr=addr(ip='127.0.0.1', port=9001), raddr=(), status='LISTEN', pid=103596),
#  sconn(fd=1, family=<AddressFamily.AF_INET: 2>, type=<SocketKind.SOCK_DGRAM: 2>, laddr=addr(ip='127.0.0.1', port=323), raddr=(), status='NONE', pid=741)]
psutil.net_if_addrs():以字典的方式返回系统上的每个网络接口的关联地址
psutil.net_if_addrs()
# {'lo': [snic(family=<AddressFamily.AF_INET: 2>, address='127.0.0.1', netmask='255.0.0.0', broadcast=None, ptp=None),
#   snic(family=<AddressFamily.AF_INET6: 10>, address='::1', netmask='ffff:ffff:ffff:ffff:ffff:ffff:ffff:ffff', broadcast=None, ptp=None),
#   snic(family=<AddressFamily.AF_PACKET: 17>, address='00:00:00:00:00:00', netmask=None, broadcast=None, ptp=None)],
#  'ens32': [snic(family=<AddressFamily.AF_INET: 2>, address='192.168.146.139', netmask='255.255.255.0', broadcast='192.168.146.255', ptp=None),
#   snic(family=<AddressFamily.AF_INET6: 10>, address='fe80::9853:19bb:b07b:89d4%ens32', netmask='ffff:ffff:ffff:ffff::', broadcast=None, ptp=None),
#   snic(family=<AddressFamily.AF_PACKET: 17>, address='00:50:56:31:d8:11', netmask=None, broadcast='ff:ff:ff:ff:ff:ff', ptp=None)]}
psutil.net_if_stats():将安装在系统上的网络接口的信息作为字典返回,其中包括isup是否启动,duplex双工模式,speed速率,mtu最大传输单位,以字节表示
psutil.net_if_stats()
# {'ens32': snicstats(isup=True, duplex=<NicDuplex.NIC_DUPLEX_FULL: 2>, speed=1000, mtu=1500),
#  'lo': snicstats(isup=True, duplex=<NicDuplex.NIC_DUPLEX_UNKNOWN: 0>, speed=0, mtu=65536)}
- 其他系统信息
import psutil,time
psutil.boot_time()  # 系统启动时间戳
# 1576293376.0
time.strftime('%Y-%m-%d %H:%M:%S',time.localtime(psutil.boot_time()))    # 格式化时间
# 2019-12-14 11:16:16

psutil.users()   #返回当前链接的系统用户
# [suser(name='root', terminal='tty1', host='', started=1527050368.0, pid=769),
#  suser(name='root', terminal='pts/0', host='192.168.146.1', started=1527559040.0, pid=122742),
#  suser(name='root', terminal='pts/1', host='192.168.146.1', started=1527559040.0, pid=122761)]
- 系统进程管理
import psutil
psutil.pids()     # 列出所有进程PID
# [1,2,3,5,6,7,8,]

p = psutil.Process(1265)  # 实例化一个Process对象,参数为进程PID
p.name()   # 进程名
# 'mysqld'
p.exe()    # 进程bin路径
# '/usr/local/mysql-5.5.32/bin/mysqld'
p.cwd()    # 进程工作目录绝对路径
# '/mysql/data'
p.status() # 进程状态
# 'sleeping'
p.create_time()  # 进程创建时间,时间戳格式
1527642963.22
p.uids()   # 进程UID信息
# puids(real=1001, effective=1001, saved=1001)
p.gids()  # 进程GID信息
# pgids(real=1001, effective=1001, saved=1001)
p.cpu_times()  # 进程CPU时间信息,包括user、system的CPU时间
# pcputimes(user=1.53, system=6.06, children_user=0.0, children_system=0.0)
p.cpu_affinity()  # get进程CPU亲和度,如果设置进程CPU亲和度,将CPU号作为参数即可
# [0, 1, 2, 3]
p.memory_info() # 进程内存rss、vms信息
# pmem(rss=45268992, vms=460525568, shared=4399104, text=9420800, lib=0, data=425431040, dirty=0)
p.io_counters() # 进程IO信息包括读写IO数及字节数
# pio(read_count=594, write_count=27, read_bytes=15859712, write_bytes=32768, read_chars=6917150, write_chars=1555)
p.connections()  # 返回发开进程socket的namedutples列表,包括fs、family、laddr等信息
# [pconn(fd=10, family=<AddressFamily.AF_INET: 2>, type=<SocketKind.SOCK_STREAM: 1>, laddr=addr(ip='0.0.0.0', port=3306), raddr=(), status='LISTEN')]
p.num_threads()  # 进程开启的线程数
# 16
p.memory_percent() # 进程内存利用率
# 2.177553778800572
psutil.process_iter(attrs=None,ad_value=None):返回一个迭代器process,为本地机器上的所有正在运行的进程生成一个类实例。
psutil.pid_exists(pid):检查给定的PID是否存在于当前进程列表中。
psutil.wait_procs(procs,timeout=None,callback=None):等待process终止实例列表的便捷函数,返回一个元组,指示哪些进程已经消失,哪些进程还活着。
class psutil.Popen(*args,**kwargs):它启动一个子进程,并完全像使用subprocess.Popen一样处理,它还提供了所有psutil.Process类的方法。Popen类的作用是获取用户启动的应用程序进程信息,以便跟踪程序进程的运行状态。
from subprocess import PIPE
p = psutil.Popen(["/usr/bin/python","-c","print('hello world')"],stdout=PIPE)
p.name()
# 'python'
p.username()
# 'root'
 p.communicate()
# (b'hello world\n', None)
进程过滤实例:
from pprint import pprint as pp

# 根据进程名查看系统中的进程名与pid
pp([p.info for p in psutil.process_iter(attrs=['pid','name']) if 'python' in p.info['name']])
# [{'name': 'ipython3', 'pid': 2429}]

pp([p.info for p in psutil.process_iter(attrs=['pid','name']) if 'mysql' in p.info['name']])
# [{'name': 'mysqld_safe', 'pid': 987}, {'name': 'mysqld', 'pid': 1265}]

# 所有用户进程
import getpass
pp([(p.pid,p.info['name']) for p in psutil.process_iter(attrs=['name','username']) if p.info['username'] == getpass.getuser()])
# [(1, 'systemd'),
#  (2, 'kthreadd'),
#  (3, 'ksoftirqd/0'),
#  (5, 'kworker/0:0H'),
#  (6, 'kworker/u256:0'),
#  ...
#  (5004, 'kworker/0:0')]

# 查看积极运行的进程:
pp([(p.pid,p.info) for p in psutil.process_iter(attrs=['name','status']) if p.info['status'] == psutil.STATUS_RUNNING])
# [(2429, {'name': 'ipython3', 'status': 'running'})]

# 使用日志文件的进程
# import os,psutil
for p in psutil.process_iter(attrs=['name','open_files']):
  for file in p.info['open_files'] or []:
    if os.path.splitext(file.path)[1] == '.log':
      print("%-5s %-10s %s" % (p.pid,p.info['name'][:10],file.path))
# 689   auditd     /var/log/audit/audit.log
# 725   vmtoolsd   /var/log/vmware-vmsvc.log
# 974   tuned      /var/log/tuned/tuned.log

# 消耗超过5M内存的进程:
pp([(p.pid,p.info['name'],p.info['memory_info'].rss) for p in psutil.process_iter(attrs=['name','memory_info']) if p.info['memory_info'].rss > 5 * 1024 * 1024])
# [(1, 'systemd', 7118848),
#  (411, 'systemd-udevd', 6254592),
#  (712, 'polkitd', 13553664),
#  (716, 'abrtd', 5734400),
#  (724, 'VGAuthService', 6262784),
#  (725, 'vmtoolsd', 6426624),
#  (974, 'tuned', 19648512),
#  (1265, 'mysqld', 45268992),
#  (2204, 'sshd', 5726208),
#  (2429, 'ipython3', 37232640)]

# 消耗量最大的3个进程
pp([(p.pid, p.info) for p in sorted(psutil.process_iter(attrs=['name', 'memory_percent']), key=lambda p: p.info['memory_percent'])][-3:])
# [(974, {'memory_percent': 0.9451434561080659, 'name': 'tuned'}),
#  (2429, {'memory_percent': 1.7909847854955845, 'name': 'ipython3'}),
#  (1265, {'memory_percent': 2.177553778800572, 'name': 'mysqld'})]

# 消耗最多CPU时间的前3个进程
pp([(p.pid, p.info['name'], sum(p.info['cpu_times'])) for p in sorted(psutil.process_iter(attrs=['name', 'cpu_times']), key=lambda p: sum(p.info['cpu_times'][:2]))][-3:])
# [(1265, 'mysqld', 13.93),
#  (2429, 'ipython3', 14.809999999999999),
#  (725, 'vmtoolsd', 16.74)]

# 导致最多I/O的前3个进程
pp([(p.pid, p.info['name']) for p in sorted(psutil.process_iter(attrs=['name', 'io_counters']), key=lambda p: p.info['io_counters'] and p.info['io_counters'][:2])][-3:])
# [(2429, 'ipython3'), (725, 'vmtoolsd'), (1, 'systemd')]


# 前3个进程打开最多的文件描述符:
pp([(p.pid, p.info) for p in sorted(psutil.process_iter(attrs=['name', 'num_fds']), key=lambda p: p.info['num_fds'])][-3:])
# [(377, {'name': 'systemd-journald', 'num_fds': 24}),
#  (1, {'name': 'systemd', 'num_fds': 43}),
#  (1307, {'name': 'master', 'num_fds': 91})]
2.2 argparse教程
- 命令行与参数解析
通俗来说,命令行与参数解析就是当你输入cmd打开dos交互界面时候,启动程序要进行的参数给定。比如在dos界面输入:
python openPythonFile.py "a" -b "number"
其中的"a",-b等就是命令行与参数解析要做的事。
python命令行与参数解析使用步骤
创建解析 -> 添加参数 -> 解析参数
下面通过一个例子进行简单创建:
import argparse
# 创建解析步骤
parser = argparse.ArgumentParser(description='Process some integers.')
# 添加参数步骤
parser.add_argument('integers', metavar='N', type=int, nargs='+',
                   help='an integer for the accumulator')
parser.add_argument('--sum', dest='accumulate', action='store_const',
                   const=sum, default=max,
                   help='sum the integers')
# 解析参数步骤
args = parser.parse_args()
print(args.accumulate(args.integers))
在终端执行:python test.py -h。运行结果:
usage: test.py [-h] [--sum] N [N ...]
Process some integers.
positional arguments:
  N           an integer for the accumulator
optional arguments:
  -h, --help  show this help message and exit
  --sum       sum the integers
- 创建解析过程参数设定
ArgumentParser(prog='', usage=None, description='Process some integers.', version=None,
              formatter_class=<class 'argparse.HelpFormatter'>, conflict_handler='error', add_help=True)
# 例如
parser = argparse.ArgumentParser(description='Process some integers.')
prog(不建议更改): 程序名称(默认sys.argv[0],默认为函数文件名),设置prog则改变这一默认(仍使用上面那个实例):
# 变更参数
parser = argparse.ArgumentParser(prog='sum or max',
                                description='Process some integers.')
# 运行结果
# 原始
usage: test.py [-h] [--sum] N [N ...]
# 变更后
usage: sum or max [-h] [--sum] N [N ...]
usage(不建议更改): 用于描述程序的使用用法(默认为添加到解析器中的参数)。在使用python xxx.py -h之后将出现。看例子:
# 变更参数
parser = argparse.ArgumentParser(usage='python test.py arguments',
                                description='Process some integers.')
# 运行结果
# 原始
usage: test.py [-h] [--sum] N [N ...]
# 变更后
usage: python test.py arguments
description: 描述文件的作用,上面实例已体现。
epilog: 参数选项帮助后的显示文本。看例子:
# 变更参数
epilog='And What can I help U?'
# 运行结果
optional arguments:
  -h, --help  show this help message and exit
  --sum       sum the intergers
And What can I help U?
parents: 共享同一个父类解析器,由ArgumentParser对象组成的列表,它们的arguments选项会被包含到新ArgumentParser对象中,类似于继承。
formatter_class(没必要改变)
help信息输出格式共有三种形式:
argparse.RawDescriptionHelpFormatter:以输入格式输出,并不将其合并为一行argparse.RawTextHelpFormatter:所有信息以输入格式输出,并不将其合并为一行argparse.ArgumentDefaultsHelpFormatter:输出参数的defalut值
prefix_chars(不建议改变): 参数前缀,默认为'-'。前缀字符,放在文件名之前。当参数过多时,可以将参数放在文件中读取。看例子:
>>> with open('args.txt', 'w') as fp:
...    fp.write('-f\nbar')
>>> parser = argparse.ArgumentParser(fromfile_prefix_chars='@')
>>> parser.add_argument('-f')
>>> parser.parse_args(['-f', 'tmp', '@args.txt'])
Namespace(f='bar')
例子中parser.parse_args(['-f','foo','@args.txt'])解析时会从文件args.txt读取,相当于['-f','foo','-f','bar']
conflict_handler(最好不要修改): 解决冲突的策略,默认情况下冲突会发生错误。
>>> parser = argparse.ArgumentParser(prog='PROG')
>>> parser.add_argument('-f', '--foo', help='old foo help')
>>> parser.add_argument('--foo', help='new foo help')
Traceback (most recent call last):
 ..
ArgumentError: argument --foo: conflicting option string(s): --foo
add_help(不建议修改): 是否增加-h/-help选项(默认为True),一般help信息都是必须的。设为False时,help信息里面不再显示-h –help信息。
argument_default: 设置一个全局的选项的缺省值,一般每个选项单独设置,基本没用。缺省为:None。
- 添加参数过程参数设定
ArgumentParser.add_argument(name or flags...[, action][, nargs][, const][, default][, type][, choices][, required][, help][, metavar][, dest])

# 例如
parser.add_argument('intergers',metavar='N',type=int,nargs='+',help='an interger for the accumulator')
parser.add_argument('--sum',dest='accumulate',action='store_const',const=sum,default=max,help='sum the intergers (default:find the max)')
知识点:
- 每一个参数都要单独设置,就像上面例子,需要两个参数就用两个add_argument 。
- 从上面的实例中也可以看到,参数分为两种:positional arguments和optional arguments。
- positional arguments参数按照参数设置的先后顺序对应读取,实际中不用设置参数名,必须有序设计。
- optional arguments参数在使用时必须使用参数名,然后是参数具体数值,设置可以是无序的。
- 程序根据prefix_chars(默认"-")自动识别positional arguments还是optional arguments。
- prefix_chars分为缩写(比如"-h")和对应的全写(比如"--help"),可以同时设置
参数设定详细解释:
name or flag: optional arguments以'-'(默认)为前缀的参数,其他的为positional arguments。上面例子已经有体现如何设定。
action: 命令行参数的操作,操作的形式有以下几种:
store:仅仅存储参数的值(默认)storeconst:存储const关键字指定的值,parser.add_argument('-t',action='store_const',const=7)store_true/store_false:值为True/False,parser.add_argument('-t',action='store_truet')append:值追加到list中(普通的store和append不是一样的?)append_const:存为列表,会根据const关键参数进行添加
>>> parser = argparse.ArgumentParser()
>>> parser.add_argument('--str', dest='types', action='append_const', const=str)
>>> parser.add_argument('--int', dest='types', action='append_const', const=int)
>>> parser.parse_args('--str --int --str --int'.split())
Namespace(l=None, types=[<type 'str'>, <type 'int'>, <type 'str'>, <type 'int'>])
count:统计参数出现的次数
>>> parser = argparse.ArgumentParser()
>>> parser.add_argument('--counte', '-c', action='count')
>>> parser.parse_args('-cccc'.split())
Namespace(counte=4)
version: 显示version信息
>>> parser = argparse.ArgumentParser()
>>> parser.add_argument('--version', action='version', version='version 2.0')
>>> parser.parse_args(['--version'])
version 2.0
nrgs: 参数的数量,有如下几个设定:
N:N个参数?:首先从命令行中获取,若没有则从const中获取,仍然没有则从default中获取*/+:任意多个参数
const: 保存为一个常量,上面在讲action行为时已经解释用法。
default: 默认值
type: 参数类型,默认为str
choices: 设置参数值的范围,如果choices中的类型不是字符串,记得指定type。看例子:
>>> parser = argparse.ArgumentParser()
>>> parser.add_argument('x', type=int, choices=range(1, 4))
>>> parser.parse_args(['3'])
Namespace(x=3)
>>> parser.parse_args(['4'])
usage: [-h] {1,2,3}
: error: argument x: invalid choice: 4 (choose from 1, 2, 3)
required: 是否为必选参数,默认为True
desk: 参数别名,看例子:
>>> parser = argparse.ArgumentParser()
>>> parser.add_argument('--foo', dest='f_name')
>>> parser.parse_args('--foo XXX'.split())
Namespace(f_name='XXX')
help: 参数的帮助信息,即解释信息
metavar: 帮助信息中显示的参数名称
定义互斥参数
group = parser.add_mutually_exclusive_group()
group.add_argument("-v", "--verbose", action="store_true")
group.add_argument("-q", "--quiet", action="store_true")
- 解析参数过程参数设定
>>> parser = argparse.ArgumentParser()
>>> parser.add_argument('x')
>>> a = parser.parse_args(['1'])
>>> a
Namespace(x='1')
>>> type(a)
<class 'argparse.Namespace'>
>>> a.x
'1'
一个完整的例子:
import sys
import argparse

def cmd():
    args = argparse.ArgumentParser(description = 'Personal Information ',epilog = 'Information end ')
    #必写属性,第一位
    args.add_argument("name",         type = str,                  help = "Your name")
    #必写属性,第二位
    args.add_argument("birth",        type = str,                  help = "birthday")
    #可选属性,默认为None
    args.add_argument("-r",'--race',  type = str, dest = "race",   help = u"民族")
    #可选属性,默认为0,范围必须在0~150
    args.add_argument("-a", "--age",  type = int, dest = "age",    help = "Your age",         default = 0,      choices=range(150))
    #可选属性,默认为male
    args.add_argument('-s',"--sex",   type = str, dest = "sex",    help = 'Your sex',         default = 'male', choices=['male', 'female'])
    #可选属性,默认为None,-p后可接多个参数
    args.add_argument("-p","--parent",type = str, dest = 'parent', help = "Your parent",      default = "None", nargs = '*')
    #可选属性,默认为None,-o后可接多个参数
    args.add_argument("-o","--other", type = str, dest = 'other',  help = "other Information",required = False,nargs = '*')

    args = args.parse_args()#返回一个命名空间,如果想要使用变量,可用args.attr
    print "argparse.args=",args,type(args)
    print 'name = %s'%args.name
    d = args.__dict__
    for key,value in d.iteritems():
        print '%s = %s'%(key,value)

if __name__=="__main__":
    cmd()
2.3 schedule模块
官方文档:https://schedule.readthedocs.io/en/stable/
使用示例
import schedule
import time

def job():
    print("I'm working...")

def job1(name):        #带参数
    print(name)

schedule.every(10).minutes.do(job)              # 每10分钟执行一次
schedule.every().hour.do(job)                   # 每小时执行一次
schedule.every().day.at("10:30").do(job)        # 每天10:30执行一次
schedule.every().monday.do(job)                 # 每周星期一执行一次
schedule.every().wednesday.at("13:15").do(job)  # 每周星期三执行一次
schedule.every().wednesday.at("13:15").do(job1,'waiwen')  # 传入参数

while True:
    schedule.run_pending()
    time.sleep(1)
如何并行执行工作: 假如每10分钟运行50个任务,每个任务耗时1分钟,这样在下一个10分钟到来时,上一轮的任务仍在运行,然后又开始了新一轮的任务。解决这个问题的方法是,为每个任务创建一个线程,让任务在线程中运行,从而并行工作。
import threading
import time
import schedule

def job():
    print("I'm running on thread %s" % threading.current_thread())

def run_threaded(job_func):
    job_thread = threading.Thread(target=job_func)
    job_thread.start()

schedule.every(10).seconds.do(run_threaded, job)
schedule.every(10).seconds.do(run_threaded, job)

while 1:
    schedule.run_pending()
    time.sleep(1)
使用队列: 使用queue队列共享,使用多个worker_thread。
import Queue
import time
import threading
import schedule


def job():
    print("I'm working")

def worker_main():
    while 1:
        job_func = jobqueue.get()
        job_func()
        jobqueue.task_done()

jobqueue = Queue.Queue()

schedule.every(10).seconds.do(jobqueue.put, job)
schedule.every(10).seconds.do(jobqueue.put, job)
schedule.every(10).seconds.do(jobqueue.put, job)
schedule.every(10).seconds.do(jobqueue.put, job)
schedule.every(10).seconds.do(jobqueue.put, job)

worker_thread = threading.Thread(target=worker_main)
worker_thread.start()

while 1:
    schedule.run_pending()
    time.sleep(1)
只运行一次任务:
def job_that_executes_once():
    # Do some work ...
    return schedule.CancelJob

schedule.every().day.at('22:30').do(job_that_executes_once)
取消任务:
def greet(name):
    print('Hello {}'.format(name))

schedule.every().day.do(greet, 'Andrea').tag('daily-tasks', 'friend')
schedule.every().hour.do(greet, 'John').tag('hourly-tasks', 'friend')
schedule.every().hour.do(greet, 'Monica').tag('hourly-tasks', 'customer')
schedule.every().day.do(greet, 'Derek').tag('daily-tasks', 'guest')

schedule.clear('daily-tasks')
随机间隔内运行任务:
def my_job():
    # This job will execute every 5 to 10 seconds.
    print('Foo')

schedule.every(5).to(10).seconds.do(my_job)
如何抛出异常: 模块不会主动抛出异常,但是可以使用装饰器捕获目标任务的异常。
import functools

def catch_exceptions(job_func, cancel_on_failure=False):
    @functools.wraps(job_func)
    def wrapper(*args, **kwargs):
        try:
            return job_func(*args, **kwargs)
        except:
            import traceback
            print(traceback.format_exc())
            if cancel_on_failure:
                return schedule.CancelJob
    return wrapper

@catch_exceptions(cancel_on_failure=True)
def bad_task():
    return 1 / 0

schedule.every(5).minutes.do(bad_task)
3.4 tqdm模块
最主要的用法有3种,自动控制、手动控制或者用于脚本或命令行。参考:https://github.com/tqdm/tqdm
最基本的用法,将tqdm()直接包装在任意迭代器上。
from tqdm import tqdm
import time

text = ""
for char in tqdm(["a", "b", "c", "d"]):
    time.sleep(0.25)
    text = text + char
trange(i)是对tqdm(range(i))特殊优化过的实例。
for i in trange(100):
    time.sleep(0.1)
如果在循环之外实例化,可以允许对tqdm()手动控制。
pbar = tqdm(["a", "b", "c", "d"])
for char in pbar:
  time.sleep(0.25)
  pbar.set_description("Processing %s" % char)
手动控制运行,用with语句手动控制tqdm()的更新。
with tqdm(total=100) as pbar:
    for i in range(10):
        time.sleep(0.1)
        pbar.update(10)
或者不用with语句,但是最后需要加上del或者close()方法。
pbar = tqdm(total=100)
for i in range(10):
    time.sleep(0.1)
    pbar.update(10)
pbar.close()
tqdm.update()方法用于手动更新进度条,对读取文件之类的流操作非常有用。
t = tqdm(total=filesize) # Initialise
for current_buffer in stream:
  ...
  t.update(len(current_buffer))
t.close()
tqdm最常用的用法是在命令行:
> time find . -name '*.py' -type f -exec cat {} \; | tqdm | wc -l

> find . -name '*.py' -type f -exec cat {} \; | tqdm --unit loc --unit_scale --total 857366 >> /dev/null

> 7z a -bd -r backup.7z docs/ | grep Compressing | tqdm --total $(find docs/ -type f | wc -l) --unit files >> backup.log
给出class tqdm的初始化参数列表
class tqdm():
  """
  Decorate an iterable object, returning an iterator which acts exactly
  like the original iterable, but prints a dynamically updating
  progressbar every time a value is requested.
  """

  def __init__(self, iterable=None, desc=None, total=None, leave=True,
               file=None, ncols=None, mininterval=0.1,
               maxinterval=10.0, miniters=None, ascii=None, disable=False,
               unit='it', unit_scale=False, dynamic_ncols=False,
               smoothing=0.3, bar_format=None, initial=0, position=None,
               postfix=None, unit_divisor=1000):
desc:str,optional。进度条的前缀miniters:int,optional。迭代过程中进度显示的最小更新间隔。unit:str,optional。定义每个迭代的单元。默认为"it",即每个迭代,在下载或解压时,设为"B",代表每个"块"。unit_scale:bool or int or float,optional。默认为False,如果设置为1或者True,会自动根据国际单位制进行转换 (kilo, mega, etc.)。比如,在下载进度条的例子中,如果为False,数据大小是按照字节显示,设为True之后转换为Kb、Mb。total:总的迭代次数,不设置则只显示统计信息,没有图形化的进度条。设置为len(iterable),会显示黑色方块的图形化进度条。
实时显示下载进度:
from urllib.request import urlretrieve
from tqdm import tqdm

class TqdmUpTo(tqdm):
    # Provides `update_to(n)` which uses `tqdm.update(delta_n)`.

    last_block = 0
    def update_to(self, block_num=1, block_size=1, total_size=None):
        '''
        block_num  : int, optional
            到目前为止传输的块 [default: 1].
        block_size : int, optional
            每个块的大小 (in tqdm units) [default: 1].
        total_size : int, optional
            文件总大小 (in tqdm units). 如果[default: None]保持不变.
        '''
        if total_size is not None:
            self.total = total_size
        self.update((block_num - self.last_block) * block_size)
        self.last_block = block_num

eg_link = "https://www.cs.toronto.edu/~kriz/cifar-10-python.tar.gz"
file = eg_link.split('/')[-1]
with TqdmUpTo(unit='B', unit_scale=True, unit_divisor=1024, miniters=1, desc=file) as t:
  # 继承至tqdm父类的初始化参数
  urlretrieve(eg_link, filename=file, reporthook=t.update_to, data=None)
实时显示解压进度: 可以用ZipFile.namelist()返回整个压缩文件的名字列表,然后逐个解压。
...
if not isdir('dir_path'):
    with ZipFile('imgs.zip', 'r') as zipf:
        for name in tqdm(zipf.namelist()[:1000],desc='Extract files', unit='files'):
            zipf.extract(name, path='dir_path')
        zipf.close()
...
三、日志系统
3.1 日志概念
日志是一种可以追踪某些软件运行时所发生事件的方法。软件开发人员可以向他们的代码中调用日志记录相关的方法来表明发生了某些事情。一个事件可以用一个可包含可选变量数据的消息来描述。此外,事件也有重要性的概念,这个重要性也可以被称为严重性级别(level)。
- 日志作用
通过log的分析,可以方便用户了解系统或软件、应用的运行情况;如果你的应用log足够丰富,也可以分析以往用户的操作行为、类型喜好、地域分布或其他更多信息;如果一个应用的log同时也分了多个级别,那么可以很轻易地分析得到该应用的健康状况,及时发现问题并快速定位、解决问题,补救损失。
简单来讲就是,我们通过记录和分析日志可以了解一个系统或软件程序运行情况是否正常,也可以在应用程序出现故障时快速定位问题。比如,做运维的同学,在接收到报警或各种问题反馈后,进行问题排查时通常都会先去看各种日志,大部分问题都可以在日志中找到答案。再比如,做开发的同学,可以通过IDE控制台上输出的各种日志进行程序调试。对于运维老司机或者有经验的开发人员,可以快速的通过日志定位到问题的根源。可见,日志的重要性不可小觑。日志的作用可以简单总结为以下3点:
- 程序调试
- 了解软件程序运行情况,是否正常
- 软件程序运行故障分析与问题定位
- 如果应用的日志信息足够详细和丰富,还可以用来做用户行为分析,如:分析用户的操作行为、类型洗好、地域分布以及其它更多的信息,由此可以实现改进业务、提高商业利益。
- 日志等级
先来思考下下面的两个问题:
- 作为开发人员,在开发一个应用程序时需要什么日志信息?在应用程序正式上线后需要什么日志信息,用log时候应该用什么级别的日志?
- 作为应用运维人员,在部署开发环境时需要什么日志信息?在部署生产环境时需要什么日志信息,用log时候应该用什么级别的日志?
在软件开发阶段或部署开发环境时,为了尽可能详细的查看应用程序的运行状态来保证上线后的稳定性,我们可能需要把该应用程序所有的运行日志全部记录下来进行分析,这是非常耗费机器性能的。当应用程序正式发布或在生产环境部署应用程序时,我们通常只需要记录应用程序的异常信息、错误信息等,这样既可以减小服务器的I/O压力,也可以避免我们在排查故障时被淹没在日志的海洋里。那么,怎样才能在不改动应用程序代码的情况下实现在不同的环境记录不同详细程度的日志呢?这就是日志等级的作用了,我们通过配置文件指定我们需要的日志等级就可以了。
不同的应用程序所定义的日志等级可能会有所差别,分的详细点的会包含以下几个等级:DEBUG、INFO、NOTICE、WARNING、ERROR、CRITICAL、ALERT、EMERGENCY。
- 日志字段信息与日志格式
本节开始问题提到过,一条日志信息对应的是一个事件的发生,而一个事件通常需要包括以下几个内容:
- 事件发生时间
- 事件发生位置
- 事件的严重程度--日志级别
- 事件内容
上面这些都是一条日志记录中可能包含的字段信息,当然还可以包括一些其他信息,如进程ID、进程名称、线程ID、线程名称等。日志格式就是用来定义一条日志记录中包含那些字段的,且日志格式通常都是可以自定义的。
说明: 输出一条日志时,日志内容和日志级别是需要开发人员明确指定的。对于而其它字段信息,只需要是否显示在日志中就可以了。
3.2 logging模块
3.2.1 logging模块介绍
logging模块定义的函数和类为应用程序和库的开发实现了一个灵活的事件日志系统。logging模块是Python的一个标准库模块,由标准库模块提供日志记录API的关键好处是所有Python模块都可以使用这个日志记录功能。所以,你的应用日志可以将你自己的日志信息与来自第三方模块的信息整合起来。
logging模块的日志级别:
logging模块默认定义了以下几个日志等级,它允许开发人员自定义其他日志级别,但是这是不被推荐的,尤其是在开发供别人使用的库时,因为这会导致日志级别的混乱。
| 日志等级(level) | 数字 | 描述 |
|---|---|---|
DEBUG |
10 | 最详细的日志信息,典型应用场景是 问题诊断 |
INFO |
20 | 信息详细程度仅次于DEBUG,通常只记录关键节点信息,用于确认一切都是按照我们预期的那样进行工作 |
WARNING |
30 | 当某些不期望的事情发生时记录的信息(如,磁盘可用空间较低),但是此时应用程序还是正常运行的 |
ERROR |
40 | 由于一个更严重的问题导致某些功能不能正常运行时记录的信息 |
CRITICAL |
50 | 当发生严重错误,导致应用程序不能继续运行时记录的信息 |
开发应用程序或部署开发环境时,可以使用DEBUG或INFO级别的日志获取尽可能详细的日志信息来进行开发或部署调试;应用上线或部署生产环境时,应该使用WARNING或ERROR或CRITICAL级别的日志来降低机器的I/O压力和提高获取错误日志信息的效率。日志级别的指定通常都是在应用程序的配置文件中进行指定的。
说明:
- 上面列表中的日志等级是从上到下依次升高的,即:
DEBUG<INFO<WARNING<ERROR<CRITICAL,而日志的信息量是依次减少的;- 当为某个应用程序指定一个日志级别后,应用程序会记录所有日志级别大于或等于指定日志级别的日志信息,而不是仅仅记录指定级别的日志信息,nginx、php等应用程序以及这里要提高的python的logging模块都是这样的。同样,logging模块也可以指定日志记录器的日志级别,只有级别大于或等于该指定日志级别的日志记录才会被输出,小于该等级的日志记录将会被丢弃。
3.2.2 logging模块使用
logging模块提供了两种记录日志的方式:使用logging提供的模块级别的函数和使用Logging日志系统的四大组件,其实,logging所提供的模块级别的日志记录函数也是对logging日志系统相关类的封装而已。
logging模块定义的模块级别的常用函数
| 函数 | 说明 |
|---|---|
logging.debug(msg,*args,**kwargs) |
创建一条严重级别为DEBUG的日志记录 |
logging.info(msg,*args,**kwargs) |
创建一条严重级别为INFO的日志记录 |
logging.warning(msg,*args,**kwargs) |
创建一条严重级别为WARNING的日志记录 |
logging.error(msg,*args,**kwargs) |
创建一条严重级别为ERROR的日志记录 |
logging.critical(msg,*args,**kwargs) |
创建一条严重级别为CRITICAL的日志记录 |
logging.log(level,*args,**kwargs) |
创建一条严重级别为level的日志记录 |
logging.basicConfig(**kwargs) |
对root logger进行一次性配置 |
其中logging.basicConfig(**kwargs)函数用于指定“要记录的日志级别”、“日志格式”、“日志输出位置”、“日志文件的打开模式”等信息,其他几个都是用于记录各个级别日志的函数。
- logging模块的四大组件
| 组件 | 说明 |
|---|---|
loggers |
提供应用程序代码直接使用的接口 |
handlers |
用于将日志记录发送到指定的目的位置 |
filters |
提供更细粒度的日志过滤功能,用于决定哪些日志记录将会被输出(其它的日志记录将会被忽略) |
formatters |
用于控制日志信息的最终输出格式 |
说明:logging模块提供的模块级别的那些函数实际上也是通过这几个组件的相关实现类来记录日志的,只是在创建这些类的实例时设置了一些默认值。
3.2.3 logging模块级别函数记录日志
回顾下前面提到的几个重要信息:
- 可以通过logging模块定义的模块级别的方法去完成简单的日志记录
- 只有级别大于或等于日志记录器指定级别的日志记录才会被输出,小于该级别的日志记录将会被丢弃。
- 最简单的日志输出
先来试着分别输出一条不同日志级别的日志记录:
import logging
logging.debug("This is a debug log.")
logging.info("This is a info log.")
logging.warning("This is a warning log.")
logging.error("This is a error log.")
logging.critical("This is a critical log.")
也可以这样写:
logging.log(logging.DEBUG, "This is a debug log.")
logging.log(logging.INFO, "This is a info log.")
logging.log(logging.WARNING, "This is a warning log.")
logging.log(logging.ERROR, "This is a error log.")
logging.log(logging.CRITICAL, "This is a critical log.")
输出结果:
WARNING:root:This is a warning log.
ERROR:root:This is a error log.
CRITICAL:root:This is a critical log.
- 为什么前面两条日志没有被打印出来: 这是因为logging模块提供的日志记录函数所使用的日志器设置的日志级别是WARNING,因此只有WARNING级别的日志记录以及大于它的ERROR和CRITICAL级别的日志记录被输出了,而小于它的DEBUG和INFO级别的日志记录被丢弃了。
- 打印出来的日志信息中各字段表示什么意思?为什么会这样输出: 上面输出结果中每行日志记录的各个字段含义分别是:日志级别:日志器名称:日志内容, 之所以会这样输出,是因为logging模块提供的日志记录函数所使用的日志器设置的日志格式默认是BASIC_FORMAT,其值为:"%(levelname)s:%(name)s:%(message)s"
- 如果将日志记录输出到文件中,而不是打印到控制台:因为在logging模块提供的日志记录函数所使用的日志器设置的处理器所指定的日志输出位置默认为:sys.stderr。
- 我是怎么知道这些的: 查看这些日志记录函数的实现代码,可以发现:当我们没有提供任何配置信息的时候,这些函数都会去调用
logging.basicConfig(**kwargs)方法,且不会向该方法传递任何参数。继续查看basicConfig()方法的代码就可以找到上面这些问题的答案了。- 怎么修改这些默认设置呢: 其实很简单,在我们调用上面这些日志记录函数之前,手动调用一下basicConfig()方法,把我们想设置的内容以参数的形式传递进去就可以了。
logging.basicConfig()函数说明
该方法用于为logging日志系统做一些基本配置,方法定义如下:logging.basicConfig(**kwargs)。该函数可接收的关键字参数如下:
| 参数 | 说明 |
|---|---|
filename |
指定日志输出目标文件的文件名,指定该设置项后日志信心就不会被输出到控制台了 |
filemode |
指定日志文件的打开模式,默认为'a'。需要注意的是,该选项要在filename指定时才有效 |
format |
指定日志格式字符串,即指定日志输出时所包含的字段信息以及它们的顺序。logging模块定义的格式字段下面会列出。 |
datefmt |
指定日期/时间格式。需要注意的是,该选项要在format中包含时间字段%(asctime)s时才有效 |
level |
指定日志器的日志级别 |
stream |
指定日志输出目标stream,如sys.stdout、sys.stderr以及网络stream。需要说明的是,stream和filename不能同时提供,否则会引发ValueError异常 |
style |
Python 3.2中新添加的配置项。指定format格式字符串的风格,可取值为'%'、'{'和'$',默认为'%' |
handlers |
Python 3.3中新添加的配置项。该选项如果被指定,它应该是一个创建了多个Handler的可迭代对象,这些handler将会被添加到root logger。需要说明的是:filename、stream和handlers这三个配置项只能有一个存在不能同时出现2个或3个,否则会引发ValueError异常。 |
- logging模块定义的格式字符串字段
我们来列举一下logging模块中定义好的可以用于format格式字符串中字段有哪些:
| 字段/属性名称 | 使用格式 | 描述 |
|---|---|---|
asctime |
%(asctime)s |
日志事件发生的时间--人类可读时间,如:2003-07-0816:49:45,896 |
created |
%(created)f |
日志事件发生的时间--时间戳,就是当时调用time.time()函数返回的值 |
relativeCreated |
%(relativeCreated)d |
日志事件发生的时间相对于logging模块加载时间的相对毫秒数(目前还不知道干嘛用的) |
msecs |
%(msecs)d |
日志事件发生事件的毫秒部分 |
levelname |
%(levelname)s |
该日志记录的文字形式的日志级别('DEBUG','INFO','WARNING','ERROR','CRITICAL') |
levelno |
%(levelno)s |
该日志记录的数字形式的日志级别(10,20,30,40,50) |
name |
%(name)s |
所使用的日志器名称,默认是'root',因为默认使用的是rootLogger |
message |
%(message)s |
日志记录的文本内容,通过msg%args计算得到的 |
pathname |
%(pathname)s |
调用日志记录函数的源码文件的全路径 |
filename |
%(filename)s |
pathname的文件名部分,包含文件后缀 |
module |
%(module)s |
filename的名称部分,不包含后缀 |
lineno |
%(lineno)d |
调用日志记录函数的源代码所在的行号 |
funcName |
%(funcName)s |
调用日志记录函数的函数名 |
process |
%(process)d |
进程ID |
processName |
%(processName)s |
进程名称,Python3.1新增 |
thread |
%(thread)d |
线程ID |
threadName |
%(thread)s |
线程名称 |
时间格式参考:时间格式
- 经过配置后的日志输出
先简单配置下日志器的日志级别
logging.basicConfig(level=logging.DEBUG)
logging.debug("This is a debug log.")
logging.info("This is a info log.")
logging.warning("This is a warning log.")
logging.error("This is a error log.")
logging.critical("This is a critical log.")
输出结果:
DEBUG:root:This is a debug log.
INFO:root:This is a info log.
WARNING:root:This is a warning log.
ERROR:root:This is a error log.
CRITICAL:root:This is a critical log.
所有等级的日志信息都被输出了,说明配置生效了。在配置日志器日志级别的基础上,在配置下日志输出目标文件和日志格式
LOG_FORMAT = "%(asctime)s - %(levelname)s - %(message)s"
logging.basicConfig(filename='my.log', level=logging.DEBUG, format=LOG_FORMAT)

logging.debug("This is a debug log.")
logging.info("This is a info log.")
logging.warning("This is a warning log.")
logging.error("This is a error log.")
logging.critical("This is a critical log.")
此时会发现控制台中已经没有输出日志内容了,但是在python代码文件的相同目录下会生成一个名为my.log的日志文件,该文件中的内容为:
2017-05-08 14:29:53,783 - DEBUG - This is a debug log.
2017-05-08 14:29:53,784 - INFO - This is a info log.
2017-05-08 14:29:53,784 - WARNING - This is a warning log.
2017-05-08 14:29:53,784 - ERROR - This is a error log.
2017-05-08 14:29:53,784 - CRITICAL - This is a critical log.
在上面的基础上,我们再来设置下日期/时间格式
LOG_FORMAT = "%(asctime)s - %(levelname)s - %(message)s"
DATE_FORMAT = "%m/%d/%Y %H:%M:%S %p"
logging.basicConfig(filename='my.log', level=logging.DEBUG, format=LOG_FORMAT, datefmt=DATE_FORMAT)
logging.debug("This is a debug log.")
logging.info("This is a info log.")
logging.warning("This is a warning log.")
logging.error("This is a error log.")
logging.critical("This is a critical log.")
此时会在my.log日志文件中看到如下输出内容:
05/08/2017 14:29:04 PM - DEBUG - This is a debug log.
05/08/2017 14:29:04 PM - INFO - This is a info log.
05/08/2017 14:29:04 PM - WARNING - This is a warning log.
05/08/2017 14:29:04 PM - ERROR - This is a error log.
05/08/2017 14:29:04 PM - CRITICAL - This is a critical log.
- 其他说明
logging.basicConfig()函数是一个一次性的简单配置工具使,也就是说只有在第一次调用该函数时会起作用,后续再次调用该函数时完全不会产生任何操作的,多次调用的设置并不是累加操作。- 日志器(Logger)是有层级关系的,上面调用的logging模块级别的函数所使用的日志器是RootLogger类的实例,其名称为'root',它是处于日志器层级关系最顶层的日志器,且该实例是以单例模式存在的。
- 如果要记录的日志中包含变量数据,可使用一个格式字符串作为这个事件的描述消息(logging.debug、logging.info等函数的第一个参数),然后将变量数据作为第二个参数*args的值进行传递,如:
logging.warning('%s is %d years old.', 'Tom', 10),输出内容为WARNING:root:Tom is 10 years old.logging.debug(),logging.info()等方法的定义中,除了msg和args参数外,还有一个**kwargs参数。它们支持3个关键字参数:exc_info,stack_info,extra,下面对这几个关键字参数作个说明。
关于exc_info,stack_info,extra关键词参数的说明:
exc_info: 其值为布尔值,如果该参数的值设置为True,则会将异常异常信息添加到日志消息中。如果没有异常信息则添加None到日志信息中。stack_info: 其值也为布尔值,默认值为False。如果该参数的值设置为True,栈信息将会被添加到日志信息中。extra: 这是一个字典(dict)参数,它可以用来自定义消息格式中所包含的字段,但是它的key不能与logging模块定义的字段冲突。
例子: 在日志消息中添加exc_info和stack_info信息,并添加两个自定义的字段ip和user
LOG_FORMAT = "%(asctime)s - %(levelname)s - %(user)s[%(ip)s] - %(message)s"
DATE_FORMAT = "%m/%d/%Y %H:%M:%S %p"
logging.basicConfig(format=LOG_FORMAT, datefmt=DATE_FORMAT)
logging.warning("Some one delete the log file.", exc_info=True, stack_info=True, extra={'user': 'Tom', 'ip':'47.98.53.222'})
输出结果:
05/08/2017 16:35:00 PM - WARNING - Tom[47.98.53.222] - Some one delete the log file.
NoneType
Stack (most recent call last):
  File "C:/Users/wader/PycharmProjects/LearnPython/day06/log.py", line 45, in <module>
    logging.warning("Some one delete the log file.", exc_info=True, stack_info=True, extra={'user': 'Tom', 'ip':'47.98.53.222'})
3.2.4 logging模块四大组件
在介绍logging模块的日志流处理流程之前,我们先来介绍下logging模块的四大组件:
| 组件名称 | 对应类名 | 功能描述 |
|---|---|---|
| 日志器 | Logger |
提供了应用程序可一直使用的接口 |
| 处理器 | Handler |
将logger创建的日志记录发送到合适的目的输出 |
| 过滤器 | Filter |
提供了更细粒度的控制工具来决定输出哪条日志记录,丢弃哪条日志记录 |
| 格式器 | Formatter |
决定日志记录的最终输出格式 |
logging模块就是通过这些组件来完成日志处理的,上面所使用的logging模块级别的函数也是通过这些组件对应的类来实现的。
这些组件之间的关系描述:
- 日志器(logger)需要通过处理器(handler)将日志信息输出到目标位置,如:文件、sys.stdout、网络等;
- 不同的处理器(handler)可以将日志输出到不同的位置;
- 日志器(logger)可以设置多个处理器(handler)将同一条日志记录输出到不同的位置;
- 每个处理器(handler)都可以设置自己的过滤器(filter)实现日志过滤,从而只保留感兴趣的日志;
- 每个处理器(handler)都可以设置自己的格式器(formatter)实现同一条日志以不同的格式输出到不同的地方。
简单点说就是:日志器(logger)是入口,真正干活儿的是处理器(handler),处理器(handler)还可以通过过滤器(filter)和格式器(formatter)对要输出的日志内容做过滤和格式化等处理操作。
下面介绍下与logging四大组件相关的类:Logger,Handler,Filter,Formatter。
- Logger类
Logger对象有3个任务要做:
- 向应用程序代码暴露几个方法,使应用程序可以在运行时记录日志消息;
- 基于日志严重等级(默认的过滤设施)或filter对象来决定要对哪些日志进行后续处理;
- 将日志消息传送给所有感兴趣的日志handlers。
Logger对象最常用的方法分为两类:配置方法和消息发送方法
最常用的配置方法如下:
| 方法 | 描述 |
|---|---|
Logger.setLevel() |
设置日志器将会处理的日志消息的最低严重级别 |
Logger.addHandler()和Logger.removeHandler() |
为该logger对象添加和移除一个handler对象 |
Logger.addFilter()和Logger.removeFilter() |
为该logger对象添加和移除一个filter对象 |
Logger.handlers和Logger.name |
获取logger的handler列表和name属性 |
关于Logger.setLevel()方法的说明: 内建等级中,级别最低的是DEBUG,级别最高的是CRITICAL。例如setLevel(logging.INFO),此时函数参数为INFO,那么该logger将只会处理INFO、WARNING、ERROR和CRITICAL级别的日志,而DEBUG级别的消息将会被忽略/丢弃。
logger对象配置完成后,可以使用下面的方法来创建日志记录:
| 方法 | 描述 |
|---|---|
Logger.debug(),Logger.info(),Logger.warning(),Logger.error(),Logger.critical() |
创建一个与它们的方法名对应等级的日志记录 |
Logger.exception() |
创建一个类似于Logger.error()的日志消息 |
Logger.log() |
需要获取一个明确的日志level参数来创建一个日志记录 |
说明:
Logger.exception()与Logger.error()的区别在于:Logger.exception()将会输出堆栈追踪信息,另外通常只是在一个exception handler中调用该方法。Logger.log()与Logger.debug()、Logger.info()等方法相比,虽然需要多传一个level参数,显得不是那么方便,但是当需要记录自定义level的日志时还是需要该方法来完成。
那么,怎样得到一个Logger对象呢?一种方式是通过Logger类的实例化方法创建一个Logger类的实例;第二种方式--logging.getLogger()方法。
logging.getLogger()方法有一个可选参数name,该参数表示将要返回的日志器的名称标识,如果不提供该参数,则其值为'root'。若以相同的name参数值多次调用getLogger()方法,将会返回指向同一个logger对象的引用。
关于logger的层级结构与有效等级的说明:
logger的名称是一个以'.'分割的层级结构,每个'.'后面的logger都是'.'前面的logger的children,例如,有一个名称为foo的logger,其它名称分别为foo.bar,foo.bar.baz和foo.bam都是foo的后代。logger有一个"有效等级(effective level)"的概念。如果一个logger上没有被明确设置一个level,那么该logger就是使用它parent的level;如果它的parent也没有明确设置level则继续向上查找parent的parent的有效level,依次类推,直到找到个一个明确设置了level的祖先为止。需要说明的是,root logger总是会有一个明确的level设置(默认为 WARNING)。当决定是否去处理一个已发生的事件时,logger的有效等级将会被用来决定是否将该事件传递给该logger的handlers进行处理。child loggers在完成对日志消息的处理后,默认会将日志消息传递给与它们的祖先loggers相关的handlers。因此,我们不必为一个应用程序中所使用的所有loggers定义和配置handlers,只需要为一个顶层的logger配置handlers,然后按照需要创建child loggers就可足够了。我们也可以通过将一个logger的propagate属性设置为False来关闭这种传递机制。
- Handler类
Handler对象的作用是(基于日志消息的level)将消息分发到handler指定的位置(文件、网络、邮件等)。Logger对象可以通过addHandler()方法为自己添加0个或者更多个handler对象。比如,一个应用程序可能想要实现以下几个日志需求:
- 把所有日志都发送到一个日志文件中;
- 把所有严重级别大于等于error的日志发送到stdout(标准输出);
- 把所有严重级别为critical的日志发送到一个email邮件地址。
这种场景就需要3个不同的handlers,每个handler复杂发送一个特定严重级别的日志到一个特定的位置。
一个handler中只有非常少数的方法是需要应用开发人员去关心的。对于使用内建handler对象的应用开发人员来说,似乎唯一相关的handler方法就是下面这几个配置方法:
| 方法 | 描述 |
|---|---|
Handler.setLevel() |
设置handler将会处理的日志消息的最低严重级别 |
Handler.setFormatter() |
为handler设置一个格式器对象 |
Handler.addFilter()和Handler.removeFilter() |
为handler添加和删除一个过滤器对象 |
需要说明的是,应用程序代码不应该直接实例化和使用Handler实例。因为Handler是一个基类,它只定义了素有handlers都应该有的接口,同时提供了一些子类可以直接使用或覆盖的默认行为。下面是一些常用的Handler:
| Handler | 描述 |
|---|---|
logging.StreamHandler |
将日志消息发送到输出到Stream,如std.out, std.err或任何file-like对象。 |
logging.FileHandler |
将日志消息发送到磁盘文件,默认情况下文件大小会无限增长 |
logging.handlers.RotatingFileHandler |
将日志消息发送到磁盘文件,并支持日志文件按大小切割 |
logging.hanlders.TimedRotatingFileHandler |
将日志消息发送到磁盘文件,并支持日志文件按时间切割 |
logging.handlers.HTTPHandler |
将日志消息以GET或POST的方式发送给一个HTTP服务器 |
logging.handlers.SMTPHandler |
将日志消息发送给一个指定的email地址 |
logging.NullHandler |
该Handler实例会忽略error messages,通常被想使用 |
logging的library开发者使用来避免'No handlers could be found for logger XXX'信息的出现。
几种常见的handlers介绍:
logging.StreamHandler: 使用这个Handler可以向类似与sys.stdout或者sys.stderr的任何文件对象(file object)输出信息。构造函数是:StreamHandler([strm])其中strm参数是一个文件对象。默认是sys.stderr。
logging.FileHandler: 和StreamHandler类似,用于向一个文件输出日志信息。不过FileHandler会帮你打开这个文件。构造函数是:FileHandler(filename[,mode]), 相关参数如下:
- filename是文件名,必须指定一个文件名
- mode是文件的打开方式。默认是’a',即添加到文件末尾。
logging.handlers.RotatingFileHandler: 这个Handler类似于上面的FileHandler,但是它可以管理文件大小。当文件达到一定大小之后,它会自动将当前日志文件改名,然后创建一个新的同名日志文件继续输出。比如日志文件是chat.log。当chat.log达到指定的大小之后,RotatingFileHandler自动把文件改名为chat.log.1。不过,如果chat.log.1已经存在,会先把chat.log.1重命名为chat.log.2...,最后重新创建chat.log,继续输出日志信息。构造函数是:RotatingFileHandler(filename[, mode[, maxBytes[, backupCount]]]), 参数如下:
- filename和mode两个参数和FileHandler一样
- maxBytes用于指定日志文件的最大文件大小。如果maxBytes为0,意味着日志文件可以无限大,这时上面描述的重命名过程就不会发生
- backupCount用于指定保留的备份文件的个数。比如,如果指定为2,当上面描述的重命名过程发生时,原有的chat.log.2并不会被更名,而是被删除。
logging.handlers.TimedRotatingFileHandler: 这个Handler和RotatingFileHandler类似,不过,它没有通过判断文件大小来决定何时重新创建日志文件,而是间隔一定时间就自动创建新的日志文件。重命名的过程与RotatingFileHandler类似,不过新的文件不是附加数字,而是当前时间。构造函数是:TimedRotatingFileHandler(filename [,when [,interval [,backupCount]]]), 参数如下:
filename参数和backupCount参数和RotatingFileHandler具有相同的意义。interval是时间间隔。when参数是一个字符串。表示时间间隔的单位,不区分大小写。它有以下取值:S秒,M分,H小时,D天,W每星期(interval==0时代表星期一),midnight 每天凌晨
logging.handlers.SocketHandler,logging.handlers.DatagramHandler: 以上两个Handler类似,都是将日志信息发送到网络。不同的是前者使用TCP协议,后者使用UDP协议。构造函数是:Handler(host, port). 其中host是主机名,port是端口名
logging.handlers.SysLogHandler
logging.handlers.NTEventLogHandler
logging.handlers.SMTPHandler
logging.handlers.MemoryHandler
logging.handlers.HTTPHandler
ConcurrentLogHandler模块(多线程): cloghandler.ConcurrentRotatingFileHandler参数说明:
filename: 日志文件地址,相对地址或绝对地址均可mode: 默认为"a"maxBytes:文件长度,超过最大长度自动分片,最初日志都会写入filename里面,到达设置的最大长度之后进行分片,分片后文件名为filename.1 filename.2,以此类推backupCount:最大日志文件保留数量,默认为0即不会删除日志文件 encoding:日志文件编码格式,默认为gbk
- Formater类
Formater对象用于配置日志信息的最终顺序、结构和内容。与logging.Handler基类不同的是,应用代码可以直接实例化Formatter类。另外,如果你的应用程序需要一些特殊的处理行为,也可以实现一个Formatter的子类来完成。
Formatter类的构造方法定义如下:logging.Formatter.__init__(fmt=None, datefmt=None, style='%')。可见,该构造方法接收3个可选参数:
fmt: 指定消息格式化字符串,如果不指定该参数则默认使用message的原始值datefmt: 指定日期格式字符串,如果不指定该参数则默认使用"%Y-%m-%d %H:%M:%S"style: Python 3.2新增的参数,可取值为 '%', '{'和 '$',如果不指定该参数则默认使用'%'
- Filter类
Filter可以被Handler和Logger用来做比level更细粒度的、更复杂的过滤功能。Filter是一个过滤器基类,它只允许某个logger层级下的日志事件通过过滤。该类定义如下:
class logging.Filter(name='')
    filter(record)
比如,一个filter实例化时传递的name参数值为'A.B',那么该filter实例将只允许名称为类似如下规则的loggers产生的日志记录通过过滤:'A.B','A.B.C','A.B.C.D','A.B.D',而名称为'A.BB','B.A.B'的loggers产生的日志则会被过滤掉。如果name的值为空字符串,则允许所有的日志事件通过过滤。
filter方法用于具体控制传递的record记录是否能通过过滤,如果该方法返回值为0表示不能通过过滤,返回值为非0表示可以通过过滤。
说明:
- 如果有需要,也可以在filter(record)方法内部改变该record,比如添加、删除或修改一些属性。
- 我们还可以通过filter做一些统计工作,比如可以计算下被一个特殊的logger或handler所处理的record数量等。
Filter类中有三个方法,addFilter(filter),removeFilter(filter)和filter(record)方法,这里主要使用addFilter和filter方法。addFilter方法需要一个filter对象,这里定义一个新的类,并且重写filter方法,将日志名为tornado.access且日志级别是20的过滤掉。
class NoParsingFilter(logging.Filter):
    def filter(self, record):
        if record.name == 'tornado.access' and record.levelno == 20:
            return False
        return True
这样我在初始化logging对象以后,将这个过滤器添加进去
logobj = logging.getLogger('server')
logobj.addFilter(NoParsingFilter())
这样添加一个过滤以后日志就会随心所欲的按照自已的方式来记录了,record也是logging的一个类LogRecord,常用的属性有name,level,pathname,lineno,msg,args,exc_info.
- name就是初始化logger对象时传入的名字
- level是级别
- pathname是哪个文件输出的这行日志
- lineno是行号
- msg是日志本身
3.4.5 logging组件记录日志
现在,我们对logging模块的重要组件及整个日志流处理流程都应该有了一个比较全面的了解,下面我们来看一个例子。 现在有以下几个日志记录的需求:
- 要求将所有级别的所有日志都写入磁盘文件中
- all.log文件中记录所有的日志信息,日志格式为:日期和时间 - 日志级别 - 日志信息
- error.log文件中单独记录error及以上级别的日志信息,日志格式为:日期和时间 - 日志级别 - 文件名[:行号] - 日志信息
- 要求all.log在每天凌晨进行日志切割
代码如下:
import logging, datetime
import logging.handlers
logger = logging.getLogger('mylogger')
logger.setLevel(logging.DEBUG)

rf_handler = logging.handlers.TimedRotatingFileHandler('all.log', when='midnight', interval=1, backupCount=7, atTime=datetime.time(0, 0, 0, 0))
rf_handler.setFormatter(logging.Formatter("%(asctime)s - %(levelname)s - %(message)s"))

f_handler = logging.FileHandler('error.log')
f_handler.setLevel(logging.ERROR)
f_handler.setFormatter(logging.Formatter("%(asctime)s - %(levelname)s - %(filename)s[:%(lineno)d] - %(message)s"))

logger.addHandler(rf_handler)
logger.addHandler(f_handler)

logger.debug('debug message')
logger.info('info message')
logger.warning('warning message')
logger.error('error message')
logger.critical('critical message')
3.3 logging日志流处理流程
下面这个图描述了日志流的处理流程:

我们来描述下上面这个图的日志流处理流程:
- (在用户代码中进行)日志记录函数调用,如:logger.info(...),logger.debug(...)等;
- 判断要记录的日志级别是否满足日志器设置的级别要求(要记录的日志级别要大于或等于日志器设置的级别才算满足要求),如果不满足则该日志记录会被丢弃并终止后续的操作,如果满足则继续下一步操作;
- 根据日志记录函数调用时掺入的参数,创建一个日志记录(LogRecord类)对象;
- 判断日志记录器上设置的过滤器是否拒绝这条日志记录,如果日志记录器上的某个过滤器拒绝,则该日志记录会被丢弃并终止后续的操作,如果日志记录器上设置的过滤器不拒绝这条日志记录或者日志记录器上没有设置过滤器则继续下一步操作--将日志记录分别交给该日志器上添加的各个处理器;
- 判断要记录的日志级别是否满足处理器设置的级别要求(要记录的日志级别要大于或等于该处理器设置的日志级别才算满足要求),如果不满足记录将会被该处理器丢弃并终止后续的操作,如果满足则继续下一步操作;
- 判断该处理器上设置的过滤器是否拒绝这条日志记录,如果该处理器上的某个过滤器拒绝,则该日志记录会被当前处理器丢弃并终止后续的操作,如果当前处理器上设置的过滤器不拒绝这条日志记录或当前处理器上没有设置过滤器测继续下一步操作;
- 如果能到这一步,说明这条日志记录经过了层层关卡允许被输出了,此时当前处理器会根据自身被设置的格式器(如果没有设置则使用默认格式)将这条日志记录进行格式化,最后将格式化后的结果输出到指定位置(文件、网络、类文件的Stream等);
- 如果日志器被设置了多个处理器的话,上面的第5-8步会执行多次;
- 这里才是完整流程的最后一步:判断该日志器输出的日志消息是否需要传递给上一级logger(之前提到过,日志器是有层级关系的)的处理器,如果propagate属性值为1则表示日志消息将会被输出到处理器指定的位置,同时还会被传递给parent日志器的handlers进行处理直到当前日志器的propagate属性为0停止,如果propagate值为0则表示不向parent日志器的handlers传递该消息,到此结束。
可见,一条日志信息要想被最终输出需要依次经过以下几次过滤:日志器等级过滤 -> 日志器的过滤器过滤 -> 日志器的处理器等级过滤 -> 日志器的处理器的过滤器过滤。需要说明的是:关于上面第9个步骤,如果propagate值为1,那么日志消息会直接传递交给上一级logger的handlers进行处理,此时上一级logger的日志等级并不会对该日志消息进行等级过滤。
3.4 logging配置日志
作为开发者,可以通过以下3种方式来配置logging:
- 使用Python代码显式的创建loggers,handlers和formatters并分别调用它们的配置函数;
- 创建一个日志配置文件,然后使用fileConfig()函数来读取该文件的内容;
- 创建一个包含配置信息的dict,然后把它传递个dictConfig()函数;
需要说明的是,logging.basicConfig()也属于第一种方式,它只是对loggers,handlers和formatters的配置函数进行了封装。另外,第二种配置方式相对于第一种配置方式的优点在于,它将配置信息和代码进行了分离,这一方面降低了日志的维护成本,同时还使得非开发人员也能够去很容易地修改日志配置。
3.4.1 python代码配置日志
代码如下:
# 创建一个日志器logger并设置其日志级别为DEBUG
logger = logging.getLogger('simple_logger')
logger.setLevel(logging.DEBUG)

# 创建一个流处理器handler并设置其日志级别为DEBUG
handler = logging.StreamHandler(sys.stdout)
handler.setLevel(logging.DEBUG)

# 创建一个格式器formatter并将其添加到处理器handler
formatter = logging.Formatter("%(asctime)s - %(name)s - %(levelname)s - %(message)s")
handler.setFormatter(formatter)

# 为日志器logger添加上面创建的处理器handler
logger.addHandler(handler)

# 日志输出
logger.debug('debug message')
logger.info('info message')
logger.warn('warn message')
logger.error('error message')
logger.critical('critical message')
运行输出:
2019-02-01 21:37:53,823 - simple_logger - DEBUG - debug message
2019-02-01 21:37:53,824 - simple_logger - INFO - info message
2019-02-01 21:37:53,824 - simple_logger - WARNING - warn message
2019-02-01 21:37:53,824 - simple_logger - ERROR - error message
2019-02-01 21:37:53,824 - simple_logger - CRITICAL - critical message
3.4.2 配置文件和fileConfig()函数配置日志
现在我们通过配置文件的方式来实现与上面同样的功能:
# 读取日志配置文件内容
logging.config.fileConfig('logging.conf')
# 创建一个日志器logger
logger = logging.getLogger('simpleExample')
# 日志输出
logger.debug('debug message')
logger.info('info message')
logger.warn('warn message')
logger.error('error message')
logger.critical('critical message')
配置文件logging.conf内容如下:
[loggers]
keys=root,simpleExample

[handlers]
keys=fileHandler,consoleHandler

[formatters]
keys=simpleFormatter

[logger_root]
level=DEBUG
handlers=fileHandler

[logger_simpleExample]
level=DEBUG
handlers=consoleHandler
qualname=simpleExample
propagate=0

[handler_consoleHandler]
class=StreamHandler
args=(sys.stdout,)
level=DEBUG
formatter=simpleFormatter

[handler_fileHandler]
class=FileHandler
args=('logging.log', 'a')
level=ERROR
formatter=simpleFormatter

[formatter_simpleFormatter]
format=%(asctime)s - %(name)s - %(levelname)s - %(message)s
datefmt=
运行输出:
2019-02-01 21:43:54,742 - simpleExample - DEBUG - debug message
2019-02-01 21:43:54,742 - simpleExample - ERROR - error message
2019-02-01 21:43:54,742 - simpleExample - CRITICAL - critical message
关于fileConfig()函数的说明:该函数实际上是对configparser模块的封装,关于configparser模块的介绍请参考。
该函数定义在loging.config模块下:
logging.config.fileConfig(fname,defaults=None,disable_existing_loggers=True)
其中参数:
fname:表示配置文件的文件名或文件对象defaults:指定传给ConfigParser的默认值disable_existing_loggers:这是一个布尔型值,默认值为True(为了向后兼容)表示禁用已经存在的logger,除非它们或者它们的祖先明确的出现在日志配置中;如果值为False则对已存在的loggers保持启动状态。
- 配置文件格式说明:
上面提到过,fileConfig()函数是对ConfigParser/configparser模块的封装,也就是说fileConfig()函数是基于ConfigParser/configparser模块来理解日志配置文件的。换句话说,fileConfig()函数所能理解的配置文件基础格式是与ConfigParser/configparser模块一致的,只是在此基础上对文件中包含的section和option做了一下规定和限制,比如:
- 配置文件中一定要包含
loggers、handlers、formatters这些section,它们通过keys这个option来指定该配置文件中已经定义好的loggers、handlers和formatters,多个值之间用逗号分隔;另外loggers这个section中的keys一定要包含root这个值;- loggers、handlers、formatters中所指定的日志器、处理器和格式器都需要在下面以单独的section进行定义。seciton的命名规则为
[logger_loggerName]、[formatter_formatterName]、[handler_handlerName]- 定义logger的section必须指定level和handlers这两个option,level的可取值为DEBUG、INFO、WARNING、ERROR、CRITICAL、NOTSET,其中NOTSET表示所有级别的日志消息都要记录,包括用户定义级别;handlers的值是以逗号分隔的handler名字列表,这里出现的handler必须出现在[handlers]这个section中,并且相应的handler必须在配置文件中有对应的section定义;
- 对于非root logger来说,除了level和handlers这两个option之外,还需要一些额外的option,其中qualname是必须提供的option,它表示在logger层级中的名字,在应用代码中通过这个名字得到logger;propagate是可选项,其默认是为1,表示消息将会传递给高层次logger的handler,通常我们需要指定其值为0,这个可以看下下面的例子;另外,对于非root logger的level如果设置为NOTSET,系统将会查找高层次的logger来决定此logger的有效level。
- 定义handler的section中必须指定class和args这两个option,level和formatter为可选option;class表示用于创建handler的类名,args表示传递给class所指定的handler类初始化方法参数,它必须是一个元组(tuple)的形式,即便只有一个参数值也需要是一个元组的形式;level与logger中的level一样,而formatter指定的是该处理器所使用的格式器,这里指定的格式器名称必须出现在formatters这个section中,且在配置文件中必须要有这个formatter的section定义;如果不指定formatter则该handler将会以消息本身作为日志消息进行记录,而不添加额外的时间、日志器名称等信息;
定义formatter的sectioin中的option都是可选的,其中包括format用于指定格式字符串,默认为消息字符串本身;datefmt用于指定asctime的时间格式,默认为'%Y-%m-%d %H:%M:%S';class用于指定格式器类名,默认为logging.Formatter;
说明: 配置文件中的class指定类名时,该类名可以是相对于logging模块的相对值,如:FileHandler、handlers.TimeRotatingFileHandler;也可以是一个绝对路径值,通过普通的import机制来解析,如自定义的handler类mypackage.mymodule.MyHandler,但是mypackage需要在Python可用的导入路径中--sys.path。
- 对于propagate属性的说明
把logging.conf中simpleExample这个handler定义中的propagate属性值改为1,或者删除这个option(默认值就是1):
[logger_simpleExample]
level=DEBUG
handlers=consoleHandler
qualname=simpleExample
propagate=1
现在来执行同样的代码:
# 读取日志配置文件内容
logging.config.fileConfig('logging.conf')

# 创建一个日志器logger
logger = logging.getLogger('simpleExample')

# 日志输出
logger.debug('debug message')
logger.info('info message')
logger.warn('warn message')
logger.error('error message')
logger.critical('critical message')
会发现,除了在控制台有输出信息时候,在logging.log文件中也有内容输出。这说明·simpleExample·这个logger在处理完日志记录后,把日志记录传递给了上级的root logger再次做处理,所有才会有两个地方都有日志记录的输出。通常,我们都需要显示的指定propagate的值为0,防止日志记录向上层logger传递。
3.4.3 字典配置信息和dictConfig()函数配置日志
字典设置:
LOG_SETTINGS = {
    'version': 1,
    'handlers': {
        'console': {
        'class': 'logging.StreamHandler',
        'level': 'INFO',
        'formatter': 'detailed',
        'stream': 'ext://sys.stdout',
        },
        'file': {
            'class': 'logging.handlers.RotatingFileHandler',
        'level': 'INFO',
        'formatter': 'detailed',
        'filename': '/tmp/junk.log',
        'mode': 'a',
        'maxBytes': 10485760,
        'backupCount': 5,
        },
    },
    'formatters': {
        'detailed': {
        'format': '%(asctime)s %(module)-17s line:%(lineno)-4d ' \
            '%(levelname)-8s %(message)s',
        },
        'email': {
            'format': 'Timestamp: %(asctime)s\nModule: %(module)s\n' \
            'Line: %(lineno)d\nMessage: %(message)s',
        },
    },
    'loggers': {
        'extensive': {
            'level':'DEBUG',
            'handlers': ['file',]
       },
    }
}
代码文件使用:
logging.config.dictConfig(LOG_SETTINGS)

logger = logging.getLogger('extensive')
logger.info("This is from Runner {0}".format(self.default_name))

logger2 = logging.getLogger('extensive')
logfile = logging.FileHandler("test.log")
logger2.addHandler(logfile)

logger2.info("This is from Runner {0} to the new file.".format(self.default_name))
3.5 日志配置模版
log_name = "test"
log_filename = "./{}.log".format(log_name)
import logging, codecs
from cloghandler import ConcurrentRotatingFileHandler
import logging.handlers
log_name = "test"
logger = logging.getLogger(log_name)
logger.setLevel(logging.DEBUG)
if not os.path.exists(log_filename): codecs.open(log_filename, "w", encoding='utf8').close()
rotate_handler = ConcurrentRotatingFileHandler(log_filename, "a", file_size)
datefmt_str = "%Y-%m-%d %H:%M:%S"
format_str = "%(asctime)s\t%(filename)s[%(lineno)d]:%(levelname)s\tProcess_ID:%(process)d(Thread_ID:%(thread)d)\t%(message)s"
formatter = logging.Formatter(format_str, datefmt_str)
rotate_handler.setFormatter(formatter)
logger.addHandler(rotate_handler)
参考链接:
四、falsk教程
参考链接:https://juejin.im/post/5a32513ff265da430f321f3d
4.1 falsk介绍
- Hello World
from flask import Flask
app = Flask(__name__)

@app.route('/')
def index():
    return '<h1>Hello World</h1>'

if __name__ == '__main__':
    app.run()
一个Web应用的代码就写完了,对,就是这么简单!保存为”hello.py”,打开控制台,到该文件目录下,运行python hello.py。如果看到
* Running on http://127.0.0.1:5000/ (Press CTRL+C to quit)
字样后,就说明服务器启动完成。打开你的浏览器,访问http://127.0.0.1:5000/,一个硕大的”Hello World”映入眼帘。
简单解释这段代码
首先引入了Flask包,并创建一个Web应用的实例”app”
from flask import Flask
app = Flask(__name__)
这里给的实例名称就是这个python模块名。
定义路由规则
@app.route('/'):这个函数级别的注解指明了当地址是根路径时,就调用下面的函数。可以定义多个路由规则,说的高大上些,这里就是MVC中的Contoller。
处理请求
def index():
    return '<h1>Hello World</h1>'
当请求的地址符合路由规则时,就会进入该函数。可以说,这里是MVC的Model层。你可以在里面获取请求的request对象,返回的内容就是response。本例中的response就是大标题”Hello World”。
启动Web服务器
if __name__ == '__main__':
    app.run()
当本文件为程序入口(也就是用python命令直接执行本文件)时,就会通过app.run()启动Web服务器。如果不是程序入口,那么该文件就是一个模块。Web服务器会默认监听本地的5000端口,但不支持远程访问。如果你想支持远程,需要在run()方法传入host=0.0.0.0,想改变监听端口的话,传入port=端口号,你还可以设置调试模式。具体例子如下:
if __name__ == '__main__':
    app.run(host='0.0.0.0', port=8888, debug=True)
注意,Flask自带的Web服务器主要还是给开发人员调试用的,在生产环境中,你最好是通过WSGI将Flask工程部署到类似Apache或Nginx的服务器上。
- 路由
从Hello World中,我们了解到URL的路由可以直接写在其要执行的函数上。有人会质疑,这样不是把Model和Controller绑在一起了吗?的确,如果你想灵活的配置Model和Controller,这样是不方便,但是对于轻量级系统来说,灵活配置意义不大,反而写在一块更利于维护。Flask路由规则都是基于Werkzeug的路由模块的,它还提供了很多强大的功能。
带参数的路由
让我们在上一篇Hello World的基础上,加上下面的函数。并运行程序。
@app.route('/hello/<name>')
def hello(name):
    return 'Hello %s' % name
当你在浏览器的地址栏中输入http://localhost:5000/hello/man,你将在页面上看到”Hello man”的字样。URL路径中/hello/后面的参数被作为hello()函数的name参数传了进来。你还可以在URL参数前添加转换器来转换参数类型,我们再来加个函数:
@app.route('/user/<int:user_id>')
def get_user(user_id):
    return 'User ID: %d' % user_id
试下访问http://localhost:5000/user/man,你会看到404错误。但是试下http://localhost:5000/user/123,页面上就会有”User ID: 123”显示出来。参数类型转换器int:帮你控制好了传入参数的类型只能是整形。目前支持的参数类型转换器有:
| 类型转换器 | 作用 |
|---|---|
| 缺省 | 字符型,但不能有斜杠 |
int: |
整型 |
float: |
浮点型 |
path: |
字符型,可有斜杠 |
另外,大家有没有注意到,Flask自带的Web服务器支持热部署。当你修改好文件并保存后,Web服务器自动部署完毕,你无需重新运行程序。
多URL的路由
一个函数上可以设施多个URL路由规则
@app.route('/')
@app.route('/hello')
@app.route('/hello/<name>')

def hello(name=None):
    if name is None:
        name = 'World'
    return 'Hello %s' % name
这个例子接受三种URL规则,/和/hello都不带参数,函数参数name值将为空,页面显示”Hello World”;/hello/<name>带参数,页面会显示参数name的值,效果与上面第一个例子相同。
- HTTP请求方法设置
HTTP请求方法常用的有Get,Post,Put,Delete。不熟悉的朋友们可以去Google查下。Flask路由规则也可以设置请求方法。
from flask import request
@app.route('/login', methods=['GET', 'POST'])
def login():
    if request.method == 'POST':
        return 'This is a POST request'
    else:
        return 'This is a GET request'
当你请求地址http://localhost:5000/login,”GET”和”POST”请求会返回不同的内容,其他请求方法则会返回405错误。有没有觉得用Flask来实现Restful风格很方便啊?
- URL构建方法
Flask提供了url_for()方法来快速获取及构建URL,方法的第一个参数指向函数名(加过@app.route注解的函数),后续的参数对应于要构建的URL变量。下面是几个例子:
url_for('login')    # 返回/login
url_for('login', id='1')    # 将id作为URL参数,返回/login?id=1
url_for('hello', name='man')    # 适配hello函数的name参数,返回/hello/man
url_for('static', filename='style.css')    # 静态文件地址,返回/static/style.css
- 静态文件位置
一个Web应用的静态文件包括了JS, CSS, 图片等,Flask的风格是将所有静态文件放在”static”子目录下。并且在代码或模板(下篇会介绍)中,使用url_for('static')来获取静态文件目录。如果你想改变这个静态目录的位置,你可以在创建应用时,指定static_folder参数。
app = Flask(__name__, static_folder='files')
4.2 模板
Flask的模板功能是基于Jinja2模板引擎实现的。让我们来实现一个例子吧。创建一个新的Flask运行文件(你应该不会忘了怎么写吧),代码如下:
from flask import Flask
from flask import render_template

app = Flask(__name__)
@app.route('/hello')
@app.route('/hello/<name>')
def hello(name=None):
    return render_template('hello.html', name=name)

if __name__ == '__main__':
    app.run(host='0.0.0.0', debug=True)
这段代码同上一篇的多URL路由的例子非常相似,区别就是hello()函数并不是直接返回字符串,而是调用了render_template()方法来渲染模板。方法的第一个参数hello.html指向你想渲染的模板名称,第二个参数name是你要传到模板去的变量,变量可以传多个。
那么这个模板hello.html在哪儿呢,变量参数又该怎么用呢?别急,接下来我们创建模板文件。在当前目录下,创建一个子目录”templates”(注意,一定要使用这个名字)。然后在”templates”目录下创建文件”hello.html”,内容如下:
<!doctype html>
<title>Hello Sample</title>
{% if name %}
    <h1>Hello {{ name }}!</h1>
{% else %}
    <h1>Hello World!</h1>
{% endif %}
这段代码是不是很像HTML?接触过其他模板引擎的朋友们肯定立马秒懂了这段代码。它就是一个HTML模板,根据name变量的值,显示不同的内容。变量或表达式由{{ }}修饰,而控制语句由{% %}修饰,其他的代码,就是我们常见的HTML。
让我们打开浏览器,输入http://localhost:5000/hello/man,页面上即显示大标题”Hello man!“。我们再看下页面源代码
<!doctype html>
<title>Hello from Flask</title>

    <h1>Hello man!</h1>
果然,模板代码进入了Hello {{ name }}!分支,而且变量{{ name }}被替换为了”man”。Jinja2的模板引擎还有更多强大的功能,包括for循环,过滤器等。模板里也可以直接访问内置对象如request, session等。对于Jinja2的细节,感兴趣的朋友们可以自己去查查。
- 模板继承
一般我们的网站虽然页面多,但是很多部分是重用的,比如页首,页脚,导航栏之类的。对于每个页面,都要写这些代码,很麻烦。Flask的Jinja2模板支持模板继承功能,省去了这些重复代码。让我们基于上面的例子,在”templates”目录下,创建一个名为”layout.html”的模板:
<!doctype html>
<title>Hello Sample</title>
<link rel="stylesheet" type="text/css" href="{{ url_for('static', filename='style.css') }}">
<div class="page">
    {% block body %}
    {% endblock %}
</div>
再修改之前的”hello.html”,把原来的代码定义在{% block body %}中,并在代码一开始”继承”上面的”layout.html”:
{% extends "layout.html" %}
{% block body %}
{% if name %}
    <h1>Hello {{ name }}!</h1>
{% else %}
    <h1>Hello World!</h1>
{% endif %}
{% endblock %}
打开浏览器,再看下http://localhost:5000/hello/man页面的源码。
<!doctype html>
<title>Hello Sample</title>
<link rel="stylesheet" type="text/css" href="/static/style.css">
<div class="page">
    <h1>Hello man!</h1>
</div>
你会发现,虽然render_template()加载了”hello.html”模板,但是”layout.html”的内容也一起被加载了。而且”hello.html”中的内容被放置在”layout.html”中{% block body %}的位置上。形象的说,就是”hello.html”继承了”layout.html”。
- HTML自动转义
我们看下下面的代码:
@app.route('/')
def index():
    return '<div>Hello %s</div>' % '<em>Flask</em>'
打开页面,你会看到”Hello Flask”字样,而且”Flask”是斜体的,因为我们加了<em>标签。但有时我们并不想让这些HTML标签自动转义,特别是传递表单参数时,很容易导致HTML注入的漏洞。我们把上面的代码改下,引入”Markup”类:
from flask import Flask, Markup

app = Flask(__name__)

@app.route('/')
def index():
    return Markup('<div>Hello %s</div>') % '<em>Flask</em>'
再次打开页面,<em>标签显示在页面上了。Markup还有很多方法,比如escape()呈现HTML标签, striptags()去除HTML标签。这里就不一一列举了。
4.3 Flask内建对象
Flask提供的内建对象常用的有request,session,g,通过request,你还可以获取cookie对象。这些对象不但可以在请求函数中使用,在模板中也可以使用。
- 请求对象request
引入flask包中的request对象,就可以直接在请求函数中直接使用该对象了。
from flask import request

@app.route('/login', methods=['POST', 'GET'])
def login():
    if request.method == 'POST':
        if request.form['user'] == 'admin':
            return 'Admin login successfully!'
        else:
            return 'No such user!'
    title = request.args.get('title', 'Default')
    return render_template('login.html', title=title)
在templates目录下,添加”login.html”文件
{% extends "layout.html" %}
{% block body %}
<form name="login" action="/login" method="post">
    Hello {{ title }}, please login by:
    <input type="text" name="user" />
</form>
{% endblock %}
执行上面的例子,结果我就不多描述了。简单解释下,request中method变量可以获取当前请求的方法,即”GET”,“POST”,“DELETE”,“PUT”等;form变量是一个字典,可以获取”Post”请求表单中的内容,在上例中,如果提交的表单中不存在user项,则会返回一个KeyError,你可以不捕获,页面会返回400错误(想避免抛出这KeyError,你可以用request.form.get('user')来替代)。而request.args.get()方法则可以获取”Get”请求URL中的参数,该函数的第二个参数是默认值,当URL参数不存在时,则返回默认值。
request相关变量:
| 变量 | 说明 |
|---|---|
request.method |
请求的方法:POST,GET等 |
request.form |
POST请求的参数 |
args,values |
args返回请求中的参数,values返回请求中的参数和form |
request.cookies |
cookies信息 |
request.headers |
请求headers信息,返回的结果是个list |
url、path、script_root、base_url、url_root |
相关url:结果比较直观request.url,request.script_root, request.path,request.base_url,request.url_root),返回结果:#url: http://192.168.1.183:5000/testrequest?a&b , script_root: , path: /testrequest , base_url: http://192.168.1.183:5000/testrequest , url_root : http://192.168.1.183:5000/ |
date、files |
date是请求的数据,files随请求上传的文件 |
- 会话对象session
会话可以用来保存当前请求的一些状态,以便于在请求之前共享信息。我们将上面的python代码改动下:
from flask import request, session

@app.route('/login', methods=['POST', 'GET'])
def login():
    if request.method == 'POST':
        if request.form['user'] == 'admin':
            session['user'] = request.form['user']
            return 'Admin login successfully!'
        else:
            return 'No such user!'
    if 'user' in session:
        return 'Hello %s!' % session['user']
    else:
        title = request.args.get('title', 'Default')
        return render_template('login.html', title=title)

app.secret_key = '123456'
你可以看到,”admin”登陆成功后,再打开”login”页面就不会出现表单了。session对象的操作就跟一个字典一样。特别提醒,使用session时一定要设置一个密钥app.secret_key,如上例。不然你会得到一个运行时错误,内容大致是RuntimeError: the session is unavailable because no secret key was set。密钥要尽量复杂,最好使用一个随机数,这样不会有重复,上面的例子不是一个好密钥。
我们顺便写个登出的方法,估计我不放例子,大家也都猜到怎么写,就是清除字典里的键值:
from flask import request, session, redirect, url_for

@app.route('/logout')
def logout():
    session.pop('user', None)
    return redirect(url_for('login'))
- 构建响应
在之前的例子中,请求的响应我们都是直接返回字符串内容,或者通过模板来构建响应内容然后返回。其实我们也可以先构建响应对象,设置一些参数(比如响应头)后,再将其返回。修改下上例中的”Get”请求部分:
from flask import request, session, make_response

@app.route('/login', methods=['POST', 'GET'])
def login():
    if request.method == 'POST':
        ...
    if 'user' in session:
        ...
    else:
        title = request.args.get('title', 'Default')
        response = make_response(render_template('login.html', title=title), 200)
        response.headers['key'] = 'value'
        return response
打开浏览器调试,在”Get”请求用户未登录状态下,你会看到响应头中有一个key项。make_response方法就是用来构建response对象的,第二个参数代表响应状态码,缺省就是”200”。response对象的详细使用可参阅Flask的官方API文档。
- Cookie的使用
提到了Session,当然也要介绍Cookie喽,毕竟没有Cookie,Session就根本没法用。Flask中使用Cookie也很简单:
from flask import request, session, make_response
import time

@app.route('/login', methods=['POST', 'GET'])
def login():
    response = None
    if request.method == 'POST':
        if request.form['user'] == 'admin':
            session['user'] = request.form['user']
            response = make_response('Admin login successfully!')
            response.set_cookie('login_time', time.strftime('%Y-%m-%d %H:%M:%S'))
        ...
    else:
        if 'user' in session:
            login_time = request.cookies.get('login_time')
            response = make_response('Hello %s, you logged in on %s' % (session['user'], login_time))
        ...

    return response
例子越来越长了,这次我们引入了time模块来获取当前系统时间。我们在返回响应时,通过response.set_cookie()函数,来设置Cookie项,之后这个项值会被保存在浏览器中。这个函数的第三个参数max_age可以设置该Cookie项的有效期,单位是秒,不设的话,在浏览器关闭后,该Cookie项即失效。在请求中,request.cookies对象就是一个保存了浏览器Cookie的字典,使用其get()函数就可以获取相应的键值。
- 全局对象g
flask.g是Flask一个全局对象,这里有点容易让人误解,其实g的作用范围,就在一个请求(也就是一个线程)里,它不能在多个请求间共享。你可以在g对象里保存任何你想保存的内容。一个最常用的例子,就是在进入请求前,保存数据库连接。这个我们会在介绍数据库集成时讲到。
4.4 错误处理
使用abort()函数可以直接退出请求,返回错误代码:
from flask import abort

@app.route('/error')
def error():
    abort(404)
上例会显示浏览器的404错误页面。有时候,我们想要在遇到特定错误代码时做些事情,或者重写错误页面,可以用下面的方法:
@app.errorhandler(404)
def page_not_found(error):
    return render_template('404.html'), 404
此时,当再次遇到404错误时,即会调用page_not_found()函数,其返回”404.html”的模板页。第二个参数代表错误代码。不过,在实际开发过程中,我们并不会经常使用abort()来退出,常用的错误处理方法一般都是异常的抛出或捕获。装饰器@app.errorhandler()除了可以注册错误代码外,还可以注册指定的异常类型。让我们来自定义一个异常:
class InvalidUsage(Exception):
    status_code = 400

    def __init__(self, message, status_code=400):
        Exception.__init__(self)
        self.message = message
        self.status_code = status_code

@app.errorhandler(InvalidUsage)
def invalid_usage(error):
    response = make_response(error.message)
    response.status_code = error.status_code
    return response
我们在上面的代码中定义了一个异常InvalidUsage,同时我们通过装饰器@app.errorhandler()修饰了函数·invalid_usage()`,装饰器中注册了我们刚定义的异常类。这也就意味着,一但遇到InvalidUsage异常被抛出,这个invalid_usage()函数就会被调用。写个路由试一试吧。
@app.route('/exception')
def exception():
    raise InvalidUsage('No privilege to access the resource', status_code=403)
- URL重定向
重定向redirect()函数的使用在上一篇logout的例子中已有出现。作用就是当客户端浏览某个网址时,将其导向到另一个网址。常见的例子,比如用户在未登录时浏览某个需授权的页面,我们将其重定向到登录页要求其登录先。
from flask import session, redirect

@app.route('/')
def index():
    if 'user' in session:
        return 'Hello %s!' % session['user']
    else:
        return redirect(url_for('login'), 302)
redirect()的第二个参数时HTTP状态码,可取的值有301,302,303,305和307,默认即302。
- 日志
提到错误处理,那一定要说到日志。Flask提供logger对象,其是一个标准的Python Logger类。修改上例中的exception()函数:
@app.route('/exception')
def exception():
    app.logger.debug('Enter exception method')
    app.logger.error('403 error happened')
    raise InvalidUsage('No privilege to access the resource', status_code=403)
执行后,你会在控制台看到日志信息。在debug模式下,日志会默认输出到标准错误stderr中。你可以添加FileHandler来使其输出到日志文件中去,也可以修改日志的记录格式,下面演示一个简单的日志配置代码:
server_log = TimedRotatingFileHandler('server.log','D')
server_log.setLevel(logging.DEBUG)
server_log.setFormatter(logging.Formatter('%(asctime)s %(levelname)s: %(message)s'))

error_log = TimedRotatingFileHandler('error.log', 'D')
error_log.setLevel(logging.ERROR)
error_log.setFormatter(logging.Formatter('%(asctime)s: %(message)s [in %(pathname)s:%(lineno)d]'))

app.logger.addHandler(server_log)
app.logger.addHandler(error_log)
上例中,我们在本地目录下创建了两个日志文件,分别是”server.log”记录所有级别日志;”error.log”只记录错误日志。我们分别给两个文件不同的内容格式。另外,我们使用了TimedRotatingFileHandler并给了参数D,这样日志每天会创建一个新的文件,并将旧文件加日期后缀来归档。
- 消息闪现
“Flask Message”是一个很有意思的功能,一般一个操作完成后,我们都希望在页面上闪出一个消息,告诉用户操作的结果。用户看完后,这个消息就不复存在了。Flask提供的flash功能就是为了这个。我们还是拿用户登录来举例子:
from flask import render_template, request, session, url_for, redirect, flash

@app.route('/')
def index():
    if 'user' in session:
        return render_template('hello.html', name=session['user'])
    else:
        return redirect(url_for('login'), 302)

@app.route('/login', methods=['POST', 'GET'])
def login():
    if request.method == 'POST':
        session['user'] = request.form['user']
        flash('Login successfully!')
        return redirect(url_for('index'))
    else:
        return '''
        '''
上例中,当用户登录成功后,就用flash()函数闪出一个消息。让我们找回第三篇中的模板代码,在”layout.html”加上消息显示的部分:
<!doctype html>
<title>Hello Sample</title>
<link rel="stylesheet" type="text/css" href="{{ url_for('static', filename='style.css') }}">
{% with messages = get_flashed_messages() %}
  {% if messages %}
    <ul class="flash">
    {% for message in messages %}
      <li>{{ message }}</li>
    {% endfor %}
    </ul>
  {% endif %}
{% endwith %}
<div class="page">
    {% block body %}
    {% endblock %}
</div>
上例中get_flashed_messages()函数就会获取我们在login()中通过flash()闪出的消息。从代码中我们可以看出,闪出的消息可以有多个。模板”hello.html”不用改。运行下试试。登录成功后,是不是出现了一条”Login successfully”文字?再刷新下页面,你会发现文字消失了。你可以通过CSS来控制这个消息的显示方式。
flash()方法的第二个参数是消息类型,可选择的有”message”, “info”, “warning”, “error”。你可以在获取消息时,同时获取消息类型,还可以过滤特定的消息类型。只需设置get_flashed_messages()方法的with_categories和category_filter参数即可。比如,python部分可改为:
@app.route('/login', methods=['POST', 'GET'])
def login():
    if request.method == 'POST':
        session['user'] = request.form['user']
        flash('Login successfully!', 'message')
        flash('Login as user: %s.' % request.form['user'], 'info')
        return redirect(url_for('index'))
    ...
layout模板部分可改为:
...
{% with messages = get_flashed_messages(with_categories=true, category_filter=["message","error"]) %}
  {% if messages %}
    <ul class="flash">
    {% for category, message in messages %}
        <li class="{{ category }}">{{ category }}: {{ message }}</li>
    {% endfor %}
    </ul>
  {% endif %}
{% endwith %}
...
运行结果大家就自己试试吧。
4.5 集成数据库
既然前几篇都用用户登录作为例子,我们这篇就继续讲登录,只是登录的信息会由数据库来验证。让我们先准备SQLite环境吧。
- 初始化数据库
怎么安装SQLite这里就不说了。我们先写个数据库表的初始化SQL,保存在”init.sql”文件中:
DROP TABLE IF EXISTS users;
CREATE TABLE users (
  id INTEGER PRIMARY KEY AUTOINCREMENT,
  name TEXT NOT NULL,
  password TEXT NOT NULL
);

INSERT INTO users (name, password) VALUES ('visit', '111');
INSERT INTO users (name, password) VALUES ('admin', '123');
运行sqlite3命令,初始化数据库。我们的数据库文件就放在”db”子目录下的”user.db”文件中。
$ sqlite3 db/user.db < init.sql
- 配置连接参数
创建配置文件”config.py”,保存配置信息:
#coding:utf8
DATABASE = 'db/user.db'       # 数据库文件位置
DEBUG = True                  # 调试模式
SECRET_KEY = 'secret_key_1'   # 会话密钥
在创建Flask应用时,导入配置信息:
from flask import Flask
import config

app = Flask(__name__)
app.config.from_object('config')
这里也可以用app.config.from_envvar('FLASK_SETTINGS', silent=True)方法来导入配置信息,此时程序会读取系统环境变量中FLASK_SETTINGS的值,来获取配置文件路径,并加载此文件。如果文件不存在,该语句返回False。参数silent=True表示忽略错误。
- 建立和释放数据库连接
这里要用到请求的上下文装饰器。
@app.before_request
def before_request():
    g.db = sqlite3.connect(app.config['DATABASE'])

@app.teardown_request
def teardown_request(exception):
    db = getattr(g, 'db', None)
    if db is not None:
        db.close()
我们在before_request()里建立数据库连接,它会在每次请求开始时被调用;并在teardown_request()关闭它,它会在每次请求关闭前被调用。
- 查询数据库
让我们取回上一篇登录部分的代码,index()和logout()请求不用修改,在login()请求中,我们会查询数据库,验证客户端输入的用户名和密码是否存在:
@app.route('/login', methods=['POST', 'GET'])
def login():
    if request.method == 'POST':
        name = request.form['user']
        passwd = request.form['passwd']
        cursor = g.db.execute('select * from users where name=? and password=?', [name, passwd])
        if cursor.fetchone() is not None:
            session['user'] = name
            flash('Login successfully!')
            return redirect(url_for('index'))
        else:
            flash('No such user!', 'error')
            return redirect(url_for('login'))
    else:
        return render_template('login.html')
模板中加上”login.html”文件
{% extends "layout.html" %}
{% block body %}
<form name="login" action="/login" method="post">
    Username: <input type="text" name="user" /><br>
    Password: <input type="password" name="passwd" /><br>
    <input type="submit" value="Submit" />
</form>
{% endblock %}
终于一个真正的登录验证写完了(前几篇都是假的),打开浏览器登录下吧。
4.6 Vue.js和Flask构建单页App
参考连接:https://juejin.im/post/5ab0a21df265da23a228efd3
建立一个单页应用程序(应用程序使用单页组成,vue-router在HTML5的History-mode以及其他更多好用的功能)用vue.js,由Flask提供Web服务?简单地说应该这样,如下所示:
- Flask为index.html服务,index.html包含我的vue.js App。
- 在前端开发中我使用Webpack,它提供了所有很酷的功能。
- Flask有API端,可以从我的SPA访问。
- 可以访问API端,甚至当为了前端开发而运行Node.js的时候。
4.6.1 客户端
将使用Vue CLI产生基本vue.js App。如果你还没有安装它,请运行:npm install -g vue-cli,客户端和后端代码将被拆分到不同的文件夹。初始化前端部分运行跟踪:
mkdir flaskvue
cd flaskvue
vue create frontend
cd frontend
npm install
# after installation
npm run dev
添加home.vue和about.vue到frontend/src/components文件夹。它们非常简单,像这样:
// Home.vue
<template>
    <div>
        <p>Home page</p>
    </div>
</template>

// About.vue
<template>
    <div>
        <p>About</p>
    </div>
</template>
我们将使用它们正确地识别我们当前的位置(根据地址栏)。现在我们需要改变frontend/src/router/index.js文件以便使用我们的新组件:
import Vue from 'vue'
import Router from 'vue-router'
const routerOptions = [
    { path: '/', component: 'Home' },
    { path: '/about', component: 'About' }
]

const routes = routerOptions.map(route => {
    return {
        route,
        component: () => import(`@/components/${route.component}.vue`)
    }
})

Vue.use(Router)
export default new Router({
    routes,
    mode: 'history'
})
如果你试着输入localhost:8080和localhost:8080/about,你应该看到相应的页面。我们几乎已经准备好构建一个项目,并且能够创建一个静态资源文件包。在此之前,让我们为它们重新定义一下输出目录。在frontend/config/index.js找到下一个设置:
index: path.resolve(__dirname, '../dist/index.html'),
assetsRoot: path.resolve(__dirname, '../dist'),
把它们改为
index: path.resolve(__dirname, '../../dist/index.html'),
assetsRoot: path.resolve(__dirname, '../../dist'),
所以/dist文件夹的HTML、CSS、JS会在同一级目录/frontend。现在你可以运行npm run build创建一个包。
4.6.2 后端
对于Flask服务器,我将使用Python版本3.6。在/flaskvue创建新的子文件夹存放后端代码并初始化虚拟环境:
# 需要安装flask: pip install Flask
mkdir backend
cd backend
现在让我们为Flask服务端编写代码。创建根目录文件run.py:
from flask import Flask, render_template
app = Flask(__name__, static_folder = "./dist/static", template_folder = "./dist")

@app.route('/')
def index():
    return render_template("index.html")
这段代码与Flask的“Hello World”代码略有不同。主要的区别是,我们指定存储静态文件和模板位置在文件夹/dist,以便和我们的前端文件夹区别开。在根文件夹中运行Flask服务端:FLASK_APP=run.py FLASK_DEBUG=1 flask run
这将启动本地主机上的Web服务器:localhost:5000上的FLASK_APP服务器端的启动文件,flask_debug=1将运行在调试模式。如果一切正确,你会看到熟悉的主页,你已经完成了对Vue的设置。
同时,如果您尝试输入/about页面,您将面临一个错误。Flask抛出一个错误,说找不到请求的URL。事实上,因为我们使用了HTML5的History-Mode在Vue-router需要配置Web服务器的重定向,将所有路径指向index.html。用Flask做起来很容易。将现有路由修改为以下:
@app.route('/', defaults={'path': ''})
@app.route('/<path:path>')
def catch_all(path):
    return render_template("index.html")
现在输入网址localhost:5000/about将重新定向到index.html和vue-router将处理路由。
4.6.3 404页
因为我们有一个包罗万象的路径,我们的Web服务器在现在已经很难赶上404错误,Flask将所有请求指向index.html(甚至不存在的页面)。所以我们需要处理未知的路径在vue.js应用。当然,所有的工作都可以在我们的路由文件中完成。
在frontend/src/router/index.js添加下一行:
const routerOptions = [
    { path: '/', component: 'Home' },
    { path: '/about', component: 'About' },
    { path: '*', component: 'NotFound' }
]
这里的路径'*'是一个通配符, Vue-router就知道除了我们上面定义的所有其他任何路径。现在我们需要更多的创造NotFound.vue文件在/components目录。试一下很简单:
// NotFound.vue
<template>
    <div>
        <p>404 - Not Found</p>
    </div>
</template>
现在运行的前端服务器再次npm run dev,尝试进入一些毫无意义的地址例如:localhost:8080/gljhewrgoh。您应该看到我们的“未找到”消息。
4.6.4 API端
我们的vue.js/flask教程的最后一个例子将是服务器端API创建和调度客户端。我们将创建一个简单的Api,它将从1到100返回一个随机数。打开run.py并添加:
from flask import Flask, render_template, jsonify
from random import *

app = Flask(__name__,static_folder = "./dist/static", template_folder = "./dist")

@app.route('/api/random')
def random_number():
    response = {
        'randomNumber': randint(1, 100)
    }
    return jsonify(response)

@app.route('/', defaults={'path': ''})
@app.route('/<path:path>')
def catch_all(path):
    return render_template("index.html")
首先我导入random库和jsonify函数从Flask库中。然后我添加了新的路由/api/random来返回像这样的JSON:
{
    "randomNumber": 36
}
你可以通过本地浏览测试这个路径:localhost:5000/api/random。此时服务器端工作已经完成。是时候在客户端显示了。我们来改变home.vue组件显示随机数:
<template>
    <div>
        <p>Home page</p>
        <p>Random number from backend: {{ randomNumber }}</p>
        <button @click="getRandom">New random number</button>
    </div>
</template>
<script>
    export default {
        data () {
            return { randomNumber: 0 }
        },

        methods: {
            getRandomInt (min, max) {
                min = Math.ceil(min)
                max = Math.floor(max)
                return Math.floor(Math.random() * (max - min + 1)) + min
            },

            getRandom () {
                this.randomNumber = this.getRandomInt(1, 100)
            }
        },
        created () {
            this.getRandom()
        }
    }
</script>
在这个阶段,我们只是模仿客户端的随机数生成过程。所以,这个组件就是这样工作的:
- 在初始化变量 randomNumber等于0。
- 在methods部分我们通过getRandomInt(min, max)功能来从指定的范围内返回一个随机数,getrandom函数将生成随机数并将赋值给randomNumber
- 组件方法getrandom创建后将会被调用来初始化随机数
- 在按钮的单击事件我们将用getrandom方法得到新的随机数
现在在主页上,你应该看到前端显示我们产生的随机数。让我们把它连接到后端。为此目的,我将用axios库。它允许我们用响应HTTP请求并用Json返回JavaScript Promise。我们安装下它:
cd frontend
npm install --save axios
打开home.vue再在<script>部分添加一些变化:
import axios from 'axios'
methods: {
    getRandom () {
        // this.randomNumber = this.getRandomInt(1, 100)
        this.randomNumber = this.getRandomFromBackend()
    },

    getRandomFromBackend () {
        const path = `http://localhost:5000/api/random`
        axios.get(path).then(response => {
            this.randomNumber = response.data.randomNumber
        }).catch(error => {
            console.log(error)
        })
    }
}
在顶部,我们需要引用Axios库。然后有一个新的方法getrandomfrombackend将使用Axios异步调用API和检索结果。最后,getrandom方法现在应该使用getrandomfrombackend函数得到一个随机值。
保存文件,到浏览器,运行一个开发服务器再次刷新localhost:8080。你应该看到控制台错误没有随机值。但别担心,一切都正常。我们得到了CORS的错误意味着Flask服务器API默认会关闭其他Web服务器(在我们这里,vue.js App是在Node.js服务器上运行的应用程序)。如果你npm run build项目,那在localhost:5000(如Flask服务器)你会看到App在工作的。但是,每次对客户端应用程序进行一些更改时,都创建一个包并不十分方便。
让我们用打包了CORS插件的Flask,将使我们能够创建一个API访问规则。插件叫做Flask CORS,让我们安装它:
pip install -U flask-cors
你可以阅读文档,更好的解释你要使你的服务器怎么样使用CORS。我将使用特定的方法,并将{“origins”: “*”}应用于所有/api/*路由(这样每个人都可以使用我的API端)。在run.py加上:
from flask_cors import CORS
app = Flask(__name__, static_folder = "./dist/static", template_folder = "./dist")
cors = CORS(app, resources={r"/api/*": {"origins": "*"}})
有了这种改变,您就可以从前端调用服务端。事实上,如果你想通过Flask提供静态文件不需要CORS。这个主意是这样的。如果应用程序在调试模式下,它只会代理我们的前端服务器。否则(在生产中)只为静态文件服务。所以我们这样做:
import requests
@app.route('/', defaults={'path': ''})
@app.route('/<path:path>')
def catch_all(path):
    if app.debug:
        return requests.get('http://localhost:8080/{}'.format(path)).text
    return render_template("index.html")
四、numpy教程
参考链接:https://www.numpy.org.cn/reference/routines/
4.1 创建数组
4.2 数组操作
4.3 二进制操作
4.4 字符串操作
4.5 时间日期相关
4.6 数据类型相关
4.7 可选的Scipy加速支持(numpy.dual)
4.8 具有自动域的数学函数(numpy.emath)
4.9 浮点错误处理
4.10 离散傅立叶变换(numpy.fft)
1.11 财金相关
1.12 实用的功能
1.13 特殊的NumPy帮助功能
1.14 索引相关
1.15 输入和输出
1.16 线性代数(numpy.linalg)
1.17 逻辑函数
1.18 操作掩码数组
1.19 数学函数
1.20 矩阵库(numpy.matlib)
1.21 杂项
1.22 填充数组
1.23 多项式
1.24 随机抽样(numpy.random)
1.25 集合操作
1.26 排序、搜索和计数
1.27 统计相关
1.28 测试支持(numpy.testing)
1.29 窗口函数
五、matplotlib教程


matplotlib的API都位于matplotlib.pyplot模块中,通常的引入约定为: import matplotlib.pyplot as plt。
画图相关的概念如图:

https://zhuanlan.zhihu.com/p/139052035
https://zhuanlan.zhihu.com/p/136854657
5.1 Figure画图
| 使用 | 代码 |
|---|---|
| 设置标题 | plt.title('AAPL stock price change') |
| 设置图例 | plt.plot(x, y, label='AAPL')plt.legend() |
| 设置坐标轴标签 | plt.xlabel('time')plt.ylabel('stock price') |
| 设置坐标轴范围 | plt.xlim(datetime(2008,1,1), datetime(2010,12,31))plt.ylim(0,300)或者 plt.axis([datetime(2008,1,1), datetime(2010,12,31), 0, 300]) |
| 设置图像大小 | plt.figure(figsize=[6,6]) |
| 设置(箭头)标注 | plt.annotate() |
| 添加文字 | plt.text()/AxesSubplot.text() |
注意设置图像大小的语句要放在plot()方法之前
- 设置箭头标注
annotate(s, xy, *args, **kwargs)
| 字段 | 说明 |
|---|---|
s |
注释字符串 |
xy |
注释目标点的坐标 |
xytext |
注释字符串的坐标 |
textcoords |
注释字符串(xytext)所在的坐标系统 默认与xy所在的相同,也可以设置为'offset points'或'offset pixels'这种偏移量的形式 |
arrowprops |
箭头属性(见下表) |
箭头样式属性:
| 名字 | 属性 |
|---|---|
'-' |
None |
'->' |
head_length=0.4,head_width=0.2 |
'-[' |
widthB=1.0,lengthB=0.2,angleB=None |
'|-|' |
widthA=1.0,widthB=1.0 |
'-|>' |
head_length=0.4,head_width=0.2 |
'<-' |
head_length=0.4,head_width=0.2 |
'<->' |
head_length=0.4,head_width=0.2 |
'<|-' |
head_length=0.4,head_width=0.2 |
'<|-|>' |
head_length=0.4,head_width=0.2 |
'fancy' |
head_length=0.4,head_width=0.4,tail_width=0.4 |
'simple' |
head_length=0.5,head_width=0.5,tail_width=0.2 |
'wedge' |
tail_width=0.3,shrink_factor=0.5 |
连接样式(具体见下图):
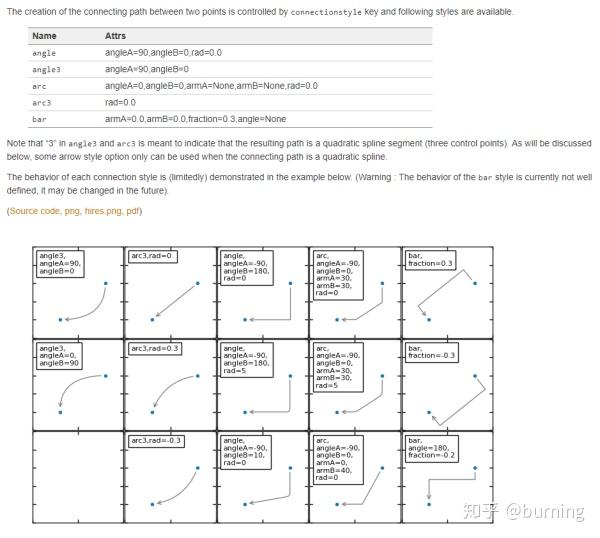
- 添加文本
text(x, y, s, fontdict=None, **kwargs):在(x,y)坐标处添加文本
| 参数 | 说明 |
|---|---|
x |
文本的x坐标 |
y |
文本的y坐标 |
s |
文本 |
fontsize |
文本字体大小 |
ha |
ha是HorizontalAlignment的简写,ha='center'即水平对齐,除此之外还可以选择'left'(左对齐)或'right'(右对齐) |
va |
va则是VerticalAlignment的简写,va可以选择['center' |
- 颜色、标记、线型和图表风格
plot(x,y,color='',marker='',linestyle=''):matplotlib的plot函数接受一组X和Y坐标,还可以通过color、marker和linestyle关键字传入指定的颜色、标记和线型,或者用一个表示颜色、标记和线型的格式字符串替代,两种方法是等效的。格式字符串中color、marker和linestyle可以任意排列,如'ko--','k--o','o--k'
常用的颜色都有一个缩写词,如:
| character | color |
|---|---|
'b' |
blue |
'g' |
green |
'r' |
red |
'c' |
cyan |
'm' |
magenta |
'y' |
yellow |
'k' |
black |
'w' |
white |
详细的corlor如下

要使用其他颜色任意颜色可以指定特定颜色的16进制颜色码,如'#998301'。
完整的marker样式:
再讲style,matplotlib的style有如下几种

以plt.style.use('ggplot')的形式使用。
- ·Subplot`画图
plt.subplots()方法创建一个figure对象和指定布局的多个子图,返回一个figure对象和一个Axes对象的数组
subplots(nrows=1, ncols=1, sharex=False, sharey=False, squeeze=True,
         subplot_kw=None, gridspec_kw=None, **fig_kw)
| 参数 | 说明 |
|---|---|
| nrows | subplot的行数 |
| ncols | subplot的列数 |
| sharex | 所有subplot使用相同的X轴刻度(调节xlim将会影响所有subplot) |
| sharey | 所有subplot使用相同的Y轴刻度(调节ylim将会影响所有subplot) |
返回的AxesSubplot对象的数组非常好用,,数组中的每个元素都代表一个子图,数组的形状就是子图的布局(layout),通过对这个数组的索引(如axes[0,1])调用AxesSubplot对象的实例方法就可以实现在对应的子图里画图了
plt.suptitle()/fig.suptitle()方法可以为figure对象添加一个居中的标题,对于多个子图的情况经常用到这一方法:suptitle(t, **kwargs)在图中添加一个居中的标题
| 参数 | 说明 |
|---|---|
t |
标题 |
fontsize |
标题文本的字体大小 |
在DataFrame/Series上调用plot()方法返回的是一个AxesSubplot对象,而用plt.plot(x,y)这种形式的绘图返回的是一个表示绘制数据的Line2D对象的列表
plt.subplot创建子图:用于在当前figure对象中添加子图
subplot(nrows, ncols, index, **kwargs)
默认情况下,matplotlib会在subplot外围留下一定的边距,并在subplot之间留下一定的间距。间距跟图像的高度和宽度有关,因此,如果调整了图像大小,间距也会自动调整。利用Figure对象subplots_adjust方法可以轻而易举地修改间距,此外,它也是一个顶级函数(可以通过plt.subplots_adjust()的方式调用)。
设置子图的标题、轴标签、刻度、刻度标签以及添加图例:
| 方法 | 说明 |
|---|---|
AxesSubplot.set_title() |
设置标题 |
AxesSubplot.set_xlabel()AxesSubplot.set_ylabel() |
设置轴标签 |
AxesSubplot.set_xticks()AxesSubplot.set_yticks() |
设置刻度(横坐标等于哪些值的时候显示刻度) |
AxesSubplot.set_xticklabels()AxesSubplot.set_yticklabels() |
设置刻度标签(刻度之下显示什么,默认是其代表的值) |
- 常见的代码
- 导入
matplotlib库简写为plt
import matplotlib.pyplot as plt
- 用plot方法画出x=(0,10)间sin的图像
x = np.linspace(0, 10, 30)
plt.plot(x, np.sin(x));
- 用点加线的方式画出x=(0,10)间sin的图像
plt.plot(x, np.sin(x), '-o');
- 用scatter方法画出x=(0,10)间sin的点图像
plt.scatter(x, np.sin(x));
- 用饼图的面积及颜色展示一组4维数据
rng = np.random.RandomState(0)
x = rng.randn(100)
y = rng.randn(100)
colors = rng.rand(100)
sizes = 1000 * rng.rand(100)

plt.scatter(x, y, c=colors, s=sizes, alpha=0.3,
            cmap='viridis')
plt.colorbar(); # 展示色阶
- 绘制一组误差为±0.8的数据的误差条图
x = np.linspace(0, 10, 50)
dy = 0.8
y = np.sin(x) + dy * np.random.randn(50)

plt.errorbar(x, y, yerr=dy, fmt='.k')
- 绘制一个柱状图
x = [1,2,3,4,5,6,7,8]
y = [3,1,4,5,8,9,7,2]
label=['A','B','C','D','E','F','G','H']

plt.bar(x,y,tick_label = label);
- 绘制一个水平方向柱状图
plt.barh(x,y,tick_label = label);
- 绘制1000个随机值的直方图
data = np.random.randn(1000)
plt.hist(data);
- 设置直方图分30个bins,并设置为频率分布
plt.hist(data, bins=30,histtype='stepfilled', density=True)
plt.show();
- 在一张图中绘制3组不同的直方图,并设置透明度
x1 = np.random.normal(0, 0.8, 1000)
x2 = np.random.normal(-2, 1, 1000)
x3 = np.random.normal(3, 2, 1000)

kwargs = dict(alpha=0.3, bins=40, density = True)

plt.hist(x1, **kwargs);
plt.hist(x2, **kwargs);
plt.hist(x3, **kwargs);
- 绘制一张二维直方图
mean = [0, 0]
cov = [[1, 1], [1, 2]]
x, y = np.random.multivariate_normal(mean, cov, 10000).T
plt.hist2d(x, y, bins=30);
- 绘制一张设置网格大小为30的六角形直方图
plt.hexbin(x, y, gridsize=30);
- 绘制x=(0,10)间sin的图像,设置线性为虚线
x = np.linspace(0,10,100)
plt.plot(x,np.sin(x),'--');
- 设置y轴显示范围为(-1.5,1.5)
x = np.linspace(0,10,100)
plt.plot(x, np.sin(x))
plt.ylim(-1.5, 1.5);
- 设置x,y轴标签variable x,value y
x = np.linspace(0.05, 10, 100)
y = np.sin(x)
plt.plot(x, y, label='sin(x)')
plt.xlabel('variable x');
plt.ylabel('value y');
- 设置图表标题“三角函数”
x = np.linspace(0.05, 10, 100)
y = np.sin(x)
plt.plot(x, y, label='sin(x)')
plt.title('三角函数');
- 显示网格
x = np.linspace(0.05, 10, 100)
y = np.sin(x)
plt.plot(x, y)
plt.grid()
- 绘制平行于x轴y=0.8的水平参考线
x = np.linspace(0.05, 10, 100)
y = np.sin(x)
plt.plot(x, y)
plt.axhline(y=0.8, ls='--', c='r')
- 绘制垂直于x轴x<4 and x>6的参考区域,以及y轴y<0.2 and y>-0.2的参考区域
x = np.linspace(0.05, 10, 100)
y = np.sin(x)
plt.plot(x, y)
plt.axvspan(xmin=4, xmax=6, facecolor='r', alpha=0.3) # 垂直x轴
plt.axhspan(ymin=-0.2, ymax=0.2, facecolor='y', alpha=0.3);  # 垂直y轴
- 添加注释文字sin(x)
x = np.linspace(0.05, 10, 100)
y = np.sin(x)
plt.plot(x, y)
plt.text(3.2, 0, 'sin(x)', weight='bold', color='r');
- 用箭头标出第一个峰值
x = np.linspace(0.05, 10, 100)
y = np.sin(x)
plt.plot(x, y)
plt.annotate('maximum',xy=(np.pi/2, 1),xytext=(np.pi/2+1, 1),
             weight='bold',
             color='r',
             arrowprops=dict(arrowstyle='->', connectionstyle='arc3', color='r'));
- 在一张图里绘制sin、cos的图形,并展示图例
x = np.linspace(0, 10, 1000)
fig, ax = plt.subplots()

ax.plot(x, np.sin(x), label='sin')
ax.plot(x, np.cos(x), '--', label='cos')
ax.legend();
- 调整图例在左上角展示,且不显示边框
ax.legend(loc='upper left', frameon=False);
- 调整图例在画面下方居中展示,且分成2列
ax.legend(frameon=False, loc='lower center', ncol=2)
- **绘制\sin(x),\sin(x+\pi/2),\sin(\pi+x)的图像,并只显示前2者的图例
y = np.sin(x[:, np.newaxis] + np.pi * np.arange(0, 2, 0.5))
lines = plt.plot(x, y)

# lines 是 plt.Line2D 类型的实例的列表
plt.legend(lines[:2], ['first', 'second']);

# 第二个方法
#plt.plot(x, y[:, 0], label='first')
#plt.plot(x, y[:, 1], label='second')
#plt.plot(x, y[:, 2:])
#plt.legend(framealpha=1, frameon=True);
- 将图例分不同的区域展示
fig, ax = plt.subplots()

lines = []
styles = ['-', '--', '-.', ':']
x = np.linspace(0, 10, 1000)

for i in range(4):
    lines += ax.plot(x, np.sin(x - i * np.pi / 2),styles[i], color='black')
ax.axis('equal')

# 设置第一组标签
ax.legend(lines[:2], ['line A', 'line B'],
          loc='upper right', frameon=False)

# 创建第二组标签
from matplotlib.legend import Legend
leg = Legend(ax, lines[2:], ['line C', 'line D'],
             loc='lower right', frameon=False)
ax.add_artist(leg);
- 展示色阶
x = np.linspace(0, 10, 1000)
I = np.sin(x) * np.cos(x[:, np.newaxis])

plt.imshow(I)
plt.colorbar();
29.改变配色为'gray'

plt.imshow(I, cmap='gray');
- 将色阶分成6个离散值显示
plt.imshow(I, cmap=plt.cm.get_cmap('Blues', 6))
plt.colorbar()
plt.clim(-1, 1);
- 在一个1010的画布中,(0.65,0.65)的位置创建一个0.20.2的子图
ax1 = plt.axes()
ax2 = plt.axes([0.65, 0.65, 0.2, 0.2])
- 在2个子图中,显示sin(x)和cos(x)的图像
fig = plt.figure()
ax1 = fig.add_axes([0.1, 0.5, 0.8, 0.4], ylim=(-1.2, 1.2))
ax2 = fig.add_axes([0.1, 0.1, 0.8, 0.4], ylim=(-1.2, 1.2))

x = np.linspace(0, 10)
ax1.plot(np.sin(x));
ax2.plot(np.cos(x));
- 用for创建6个子图,并且在图中标识出对应的子图坐标
for i in range(1, 7):
    plt.subplot(2, 3, i)
    plt.text(0.5, 0.5, str((2, 3, i)),fontsize=18, ha='center')

# 方法二
# fig = plt.figure()
# fig.subplots_adjust(hspace=0.4, wspace=0.4)
# for i in range(1, 7):
#     ax = fig.add_subplot(2, 3, i)
#     ax.text(0.5, 0.5, str((2, 3, i)),fontsize=18, ha='center')
- 设置相同行和列共享x,y轴
fig, ax = plt.subplots(2, 3, sharex='col', sharey='row')
- 用[]的方式取出每个子图,并添加子图座标文字
for i in range(2):
    for j in range(3):
        ax[i, j].text(0.5, 0.5, str((i, j)),fontsize=18, ha='center')
- 组合绘制大小不同的子图,样式如下

grid = plt.GridSpec(2, 3, wspace=0.4, hspace=0.3)
plt.subplot(grid[0, 0])
plt.subplot(grid[0, 1:])
plt.subplot(grid[1, :2])
plt.subplot(grid[1, 2]);
- 显示一组二维数据的频度分布,并分别在x,y轴上,显示该维度的数据的频度分布
mean = [0, 0]
cov = [[1, 1], [1, 2]]
x, y = np.random.multivariate_normal(mean, cov, 3000).T

# Set up the axes with gridspec
fig = plt.figure(figsize=(6, 6))
grid = plt.GridSpec(4, 4, hspace=0.2, wspace=0.2)
main_ax = fig.add_subplot(grid[:-1, 1:])
y_hist = fig.add_subplot(grid[:-1, 0], xticklabels=[], sharey=main_ax)
x_hist = fig.add_subplot(grid[-1, 1:], yticklabels=[], sharex=main_ax)

# scatter points on the main axes
main_ax.scatter(x, y,s=3,alpha=0.2)

# histogram on the attached axes
x_hist.hist(x, 40, histtype='stepfilled',
            orientation='vertical')
x_hist.invert_yaxis()

y_hist.hist(y, 40, histtype='stepfilled',
            orientation='horizontal')
y_hist.invert_xaxis()
- 创建一个三维画布
from mpl_toolkits import mplot3d
fig = plt.figure()
ax = plt.axes(projection='3d')
- 绘制一个三维螺旋线
ax = plt.axes(projection='3d')

# Data for a three-dimensional line
zline = np.linspace(0, 15, 1000)
xline = np.sin(zline)
yline = np.cos(zline)
ax.plot3D(xline, yline, zline);
- 绘制一组三维点
ax = plt.axes(projection='3d')
zdata = 15 * np.random.random(100)
xdata = np.sin(zdata) + 0.1 * np.random.randn(100)
ydata = np.cos(zdata) + 0.1 * np.random.randn(100)
ax.scatter3D(xdata, ydata, zdata, c=zdata, cmap='Greens');
- 展示前5个宝可梦的Defense,Attack,HP的堆积条形图
pokemon = df['Name'][:5]
hp = df['HP'][:5]
attack = df['Attack'][:5]
defense = df['Defense'][:5]
ind = [x for x, _ in enumerate(pokemon)]

plt.figure(figsize=(10,10))
plt.bar(ind, defense, width=0.8, label='Defense', color='blue', bottom=attack+hp)
plt.bar(ind, attack, width=0.8, label='Attack', color='gold', bottom=hp)
plt.bar(ind, hp, width=0.8, label='Hp', color='red')

plt.xticks(ind, pokemon)
plt.ylabel("Value")
plt.xlabel("Pokemon")
plt.legend(loc="upper right")
plt.title("5 Pokemon Defense & Attack & Hp")

plt.show()
- 展示前5个宝可梦的Attack,HP的簇状条形图
N = 5
pokemon_hp = df['HP'][:5]
pokemon_attack = df['Attack'][:5]

ind = np.arange(N)
width = 0.35
plt.bar(ind, pokemon_hp, width, label='HP')
plt.bar(ind + width, pokemon_attack, width,label='Attack')

plt.ylabel('Values')
plt.title('Pokemon Hp & Attack')

plt.xticks(ind + width / 2, (df['Name'][:5]),rotation=45)
plt.legend(loc='best')
plt.show()
- 展示前5个宝可梦的Defense,Attack,HP的堆积图
x = df['Name'][:4]
y1 = df['HP'][:4]
y2 = df['Attack'][:4]
y3 = df['Defense'][:4]

labels = ["HP ", "Attack", "Defense"]

fig, ax = plt.subplots()
ax.stackplot(x, y1, y2, y3)
ax.legend(loc='upper left', labels=labels)
plt.xticks(rotation=90)
plt.show()
- 公用x轴,展示前5个宝可梦的Defense,Attack,HP的折线图
x = df['Name'][:5]
y1 = df['HP'][:5]
y2 = df['Attack'][:5]
y3 = df['Defense'][:5]

# Create two subplots sharing y axis
fig, (ax1, ax2,ax3) = plt.subplots(3, sharey=True)

ax1.plot(x, y1, 'ko-')
ax1.set(title='3 subplots', ylabel='HP')

ax2.plot(x, y2, 'r.-')
ax2.set(xlabel='Pokemon', ylabel='Attack')

ax3.plot(x, y3, ':')
ax3.set(xlabel='Pokemon', ylabel='Defense')

plt.show()
- 展示前15个宝可梦的Attack,HP的折线图
plt.plot(df['HP'][:15], '-r',label='HP')
plt.plot(df['Attack'][:15], ':g',label='Attack')
plt.legend();
- 用scatter的x,y,c属性,展示所有宝可梦的Defense,Attack,HP数据
x = df['Attack']
y = df['Defense']
colors = df['HP']

plt.scatter(x, y, c=colors, alpha=0.5)
plt.title('Scatter plot')
plt.xlabel('HP')
plt.ylabel('Attack')
plt.colorbar();
- 展示所有宝可梦的攻击力的分布直方图,bins=10
x = df['Attack']
num_bins = 10
n, bins, patches = plt.hist(x, num_bins, facecolor='blue', alpha=0.5)
plt.title('Histogram')
plt.xlabel('Attack')
plt.ylabel('Value')
plt.show()
- 展示所有宝可梦Type 1的饼图
plt.figure(1, figsize=(8,8))
df['Type 1'].value_counts().plot.pie(autopct="%1.1f%%")
plt.legend()
- 展示所有宝可梦Type 1的柱状图
ax = df['Type 1'].value_counts().plot.bar(figsize = (12,6),fontsize = 14)
ax.set_title("Pokemon Type 1 Count", fontsize = 20)
ax.set_xlabel("Pokemon Type 1", fontsize = 20)
ax.set_ylabel("Value", fontsize = 20)

plt.show()
- 展示综合评分最高的10只宝可梦的系数间的相关系数矩阵
import seaborn as sns

top_10_pokemon=df.sort_values(by='Total',ascending=False).head(10)
corr=top_10_pokemon.corr()

fig, ax=plt.subplots(figsize=(10, 6))
sns.heatmap(corr,annot=True)
ax.set_ylim(9, 0)
plt.show()
- 标题/图例/坐标轴标签无法设置成中文
# 开头导入以下几行代码即可
import matplotlib as mpl
mpl.rcParams['font.sans-serif']=['Microsoft YaHei']  # 步骤一(替换sans-serif字体)
mpl.rcParams['axes.unicode_minus']=False   # 步骤二(解决坐标轴负数的负号显示问题)
或
plt.rcParams['font.sans-serif'] = ['SimHei']
plt.rcParams['axes.unicode_minus'] = False
二、样例
2.1 Lines,bars and markers
- Filled polygon
import numpy as np
import matplotlib.pyplot as plt


def koch_snowflake(order, scale=10):
    """
    Return two lists x, y of point coordinates of the Koch snowflake.
    Arguments
    ---------
    order : int
        The recursion depth.
    scale : float
        The extent of the snowflake (edge length of the base triangle).
    """
    def _koch_snowflake_complex(order):
        if order == 0:
            # initial triangle
            angles = np.array([0, 120, 240]) + 90
            return scale / np.sqrt(3) * np.exp(np.deg2rad(angles) * 1j)
        else:
            ZR = 0.5 - 0.5j * np.sqrt(3) / 3

            p1 = _koch_snowflake_complex(order - 1)  # start points
            p2 = np.roll(p1, shift=-1)  # end points
            dp = p2 - p1  # connection vectors

            new_points = np.empty(len(p1) * 4, dtype=np.complex128)
            new_points[::4] = p1
            new_points[1::4] = p1 + dp / 3
            new_points[2::4] = p1 + dp * ZR
            new_points[3::4] = p1 + dp / 3 * 2
            return new_points

    points = _koch_snowflake_complex(order)
    x, y = points.real, points.imag
    return x, y
基本使用:
x, y = koch_snowflake(order=5)

plt.figure(figsize=(8, 8))
plt.axis('equal')
plt.fill(x, y)
plt.show()

使用facecolor和edgecolor来修改颜色:
x, y = koch_snowflake(order=2)

fig, (ax1, ax2, ax3) = plt.subplots(1, 3, figsize=(9, 3),
                                    subplot_kw={'aspect': 'equal'})
ax1.fill(x, y)
ax2.fill(x, y, facecolor='lightsalmon', edgecolor='orangered', linewidth=3)
ax3.fill(x, y, facecolor='none', edgecolor='purple', linewidth=3)

plt.show() # 自己试验
2.2 Images, contours and fields
- Barcode Demo
"""
============
Barcode Demo
============

This demo shows how to produce a one-dimensional image, or "bar code".
"""
import matplotlib.pyplot as plt
import numpy as np

# Fixing random state for reproducibility
np.random.seed(19680801)

# the bar
x = np.random.rand(500) > 0.7

barprops = dict(aspect='auto', cmap='binary', interpolation='nearest')

fig = plt.figure()

# a vertical barcode
ax1 = fig.add_axes([0.1, 0.1, 0.1, 0.8])
ax1.set_axis_off()
ax1.imshow(x.reshape((-1, 1)), **barprops)

# a horizontal barcode
ax2 = fig.add_axes([0.3, 0.4, 0.6, 0.2])
ax2.set_axis_off()
ax2.imshow(x.reshape((1, -1)), **barprops)

plt.show()
- Creating annotated heatmaps
A simple categorical heatmap:
import numpy as np
import matplotlib
import matplotlib.pyplot as plt
# sphinx_gallery_thumbnail_number = 2

vegetables = ["cucumber", "tomato", "lettuce", "asparagus",
              "potato", "wheat", "barley"]
farmers = ["Farmer Joe", "Upland Bros.", "Smith Gardening",
           "Agrifun", "Organiculture", "BioGoods Ltd.", "Cornylee Corp."]

harvest = np.array([[0.8, 2.4, 2.5, 3.9, 0.0, 4.0, 0.0],
                    [2.4, 0.0, 4.0, 1.0, 2.7, 0.0, 0.0],
                    [1.1, 2.4, 0.8, 4.3, 1.9, 4.4, 0.0],
                    [0.6, 0.0, 0.3, 0.0, 3.1, 0.0, 0.0],
                    [0.7, 1.7, 0.6, 2.6, 2.2, 6.2, 0.0],
                    [1.3, 1.2, 0.0, 0.0, 0.0, 3.2, 5.1],
                    [0.1, 2.0, 0.0, 1.4, 0.0, 1.9, 6.3]])


fig, ax = plt.subplots()
im = ax.imshow(harvest)

# We want to show all ticks...
ax.set_xticks(np.arange(len(farmers)))
ax.set_yticks(np.arange(len(vegetables)))
# ... and label them with the respective list entries
ax.set_xticklabels(farmers)
ax.set_yticklabels(vegetables)

# Rotate the tick labels and set their alignment.
plt.setp(ax.get_xticklabels(), rotation=45, ha="right", rotation_mode="anchor")

# Loop over data dimensions and create text annotations.
for i in range(len(vegetables)):
    for j in range(len(farmers)):
        text = ax.text(j, i, harvest[i, j], ha="center", va="center", color="w")

ax.set_title("Harvest of local farmers (in tons/year)")
fig.tight_layout()
plt.show()
Using the helper function code style:
def heatmap(data, row_labels, col_labels, ax=None, cbar_kw={}, cbarlabel="", **kwargs):
    """
    Create a heatmap from a numpy array and two lists of labels.
    Parameters
    -------------
    data
        A 2D numpy array of shape (N, M).
    row_labels
        A list or array of length N with the labels for the rows.
    col_labels
        A list or array of length M with the labels for the columns.
    ax
        A `matplotlib.axes.Axes` instance to which the heatmap is plotted.  If
        not provided, use current axes or create a new one.  Optional.
    cbar_kw
        A dictionary with arguments to `matplotlib.Figure.colorbar`.  Optional.
    cbarlabel
        The label for the colorbar.  Optional.
    **kwargs
        All other arguments are forwarded to `imshow`.
    """

    if not ax:
        ax = plt.gca()

    # Plot the heatmap
    im = ax.imshow(data, **kwargs)

    # Create colorbar
    cbar = ax.figure.colorbar(im, ax=ax, **cbar_kw)
    cbar.ax.set_ylabel(cbarlabel, rotation=-90, va="bottom")

    # We want to show all ticks...
    ax.set_xticks(np.arange(data.shape[1]))
    ax.set_yticks(np.arange(data.shape[0]))
    # ... and label them with the respective list entries.
    ax.set_xticklabels(col_labels)
    ax.set_yticklabels(row_labels)

    # Let the horizontal axes labeling appear on top.
    ax.tick_params(top=True, bottom=False,labeltop=True, labelbottom=False)

    # Rotate the tick labels and set their alignment.
    plt.setp(ax.get_xticklabels(), rotation=-30, ha="right", rotation_mode="anchor")

    # Turn spines off and create white grid.
    for edge, spine in ax.spines.items():
        spine.set_visible(False)

    ax.set_xticks(np.arange(data.shape[1]+1)-.5, minor=True)
    ax.set_yticks(np.arange(data.shape[0]+1)-.5, minor=True)
    ax.grid(which="minor", color="w", linestyle='-', linewidth=3)
    ax.tick_params(which="minor", bottom=False, left=False)

    return im, cbar


def annotate_heatmap(im, data=None, valfmt="{x:.2f}", textcolors=["black", "white"],
                     threshold=None, **textkw):
    """
    A function to annotate a heatmap.
    Parameters
    ---------------
    im
        The AxesImage to be labeled.
    data
        Data used to annotate.  If None, the image's data is used.  Optional.
    valfmt
        The format of the annotations inside the heatmap.  This should either
        use the string format method, e.g. "$ {x:.2f}", or be a
        `matplotlib.ticker.Formatter`.  Optional.
    textcolors
        A list or array of two color specifications.  The first is used for
        values below a threshold, the second for those above.  Optional.
    threshold
        Value in data units according to which the colors from textcolors are
        applied.  If None (the default) uses the middle of the colormap as
        separation.  Optional.
    **kwargs
        All other arguments are forwarded to each call to `text` used to create
        the text labels.
    """

    if not isinstance(data, (list, np.ndarray)):
        data = im.get_array()

    # Normalize the threshold to the images color range.
    if threshold is not None:
        threshold = im.norm(threshold)
    else:
        threshold = im.norm(data.max())/2.

    # Set default alignment to center, but allow it to be overwritten by textkw.
    kw = dict(horizontalalignment="center", verticalalignment="center")
    kw.update(textkw)

    # Get the formatter in case a string is supplied
    if isinstance(valfmt, str):
        valfmt = matplotlib.ticker.StrMethodFormatter(valfmt)

    # Loop over the data and create a `Text` for each "pixel".
    # Change the text's color depending on the data.
    texts = []
    for i in range(data.shape[0]):
        for j in range(data.shape[1]):
            kw.update(color=textcolors[int(im.norm(data[i, j]) > threshold)])
            text = im.axes.text(j, i, valfmt(data[i, j], None), **kw)
            texts.append(text)

    return texts

fig, ax = plt.subplots()
im, cbar = heatmap(harvest, vegetables, farmers, ax=ax,cmap="YlGn", cbarlabel="harvest [t/year]")
texts = annotate_heatmap(im, valfmt="{x:.1f} t")

fig.tight_layout()
plt.show()
Some more complex heatmap examples:
np.random.seed(19680801)
fig, ((ax, ax2), (ax3, ax4)) = plt.subplots(2, 2, figsize=(8, 6))

# Replicate the above example with a different font size and colormap.
im, _ = heatmap(harvest, vegetables, farmers, ax=ax, cmap="Wistia", cbarlabel="harvest [t/year]")
annotate_heatmap(im, valfmt="{x:.1f}", size=7)

# Create some new data, give further arguments to imshow (vmin),
# use an integer format on the annotations and provide some colors.
data = np.random.randint(2, 100, size=(7, 7))
y = ["Book {}".format(i) for i in range(1, 8)]
x = ["Store {}".format(i) for i in list("ABCDEFG")]
im, _ = heatmap(data, y, x, ax=ax2, vmin=0, cmap="magma_r", cbarlabel="weekly sold copies")
annotate_heatmap(im, valfmt="{x:d}", size=7, threshold=20, textcolors=["red", "white"])

# Sometimes even the data itself is categorical. Here we use a
# :class:`matplotlib.colors.BoundaryNorm` to get the data into classes
# and use this to colorize the plot, but also to obtain the class
# labels from an array of classes.

data = np.random.randn(6, 6)
y = ["Prod. {}".format(i) for i in range(10, 70, 10)]
x = ["Cycle {}".format(i) for i in range(1, 7)]

qrates = np.array(list("ABCDEFG"))
norm = matplotlib.colors.BoundaryNorm(np.linspace(-3.5, 3.5, 8), 7)
fmt = matplotlib.ticker.FuncFormatter(lambda x, pos: qrates[::-1][norm(x)])

im, _ = heatmap(data, y, x, ax=ax3,cmap=plt.get_cmap("PiYG", 7), norm=norm,
                cbar_kw=dict(ticks=np.arange(-3, 4), format=fmt),cbarlabel="Quality Rating")
annotate_heatmap(im, valfmt=fmt, size=9, fontweight="bold", threshold=-1,
                 textcolors=["red", "black"])

# We can nicely plot a correlation matrix. Since this is bound by -1 and 1,
# we use those as vmin and vmax. We may also remove leading zeros and hide
# the diagonal elements (which are all 1) by using a
# :class:`matplotlib.ticker.FuncFormatter`.
corr_matrix = np.corrcoef(np.random.rand(6, 5))
im, _ = heatmap(corr_matrix, vegetables, vegetables, ax=ax4, cmap="PuOr", vmin=-1, vmax=1,
                cbarlabel="correlation coeff.")


def func(x, pos):
    return "{:.2f}".format(x).replace("0.", ".").replace("1.00", "")

annotate_heatmap(im, valfmt=matplotlib.ticker.FuncFormatter(func), size=7)

plt.tight_layout()
plt.show()
2.3 Subplots, axes and figures
2.4 Statistics
- Demo of the histogram (hist) function with a few features
"""
=========================================================
Demo of the histogram (hist) function with a few features
=========================================================

In addition to the basic histogram, this demo shows a few optional features:

* Setting the number of data bins.
* The ``normed`` flag, which normalizes bin heights so that the integral of
  the histogram is 1. The resulting histogram is an approximation of the
  probability density function.
* Setting the face color of the bars.
* Setting the opacity (alpha value).

Selecting different bin counts and sizes can significantly affect the shape
of a histogram. The Astropy docs have a great section_ on how to select these
parameters.

.. _section: http://docs.astropy.org/en/stable/visualization/histogram.html
"""

import matplotlib
import numpy as np
import matplotlib.pyplot as plt

np.random.seed(19680801)

# example data
mu = 100  # mean of distribution
sigma = 15  # standard deviation of distribution
x = mu + sigma * np.random.randn(437)

num_bins = 50

fig, ax = plt.subplots()

# the histogram of the data
n, bins, patches = ax.hist(x, num_bins, density=1)

# add a 'best fit' line
y = ((1 / (np.sqrt(2 * np.pi) * sigma)) * np.exp(-0.5 * (1 / sigma * (bins - mu))**2))
ax.plot(bins, y, '--')
ax.set_xlabel('Smarts')
ax.set_ylabel('Probability density')
ax.set_title(r'Histogram of IQ: $\mu=100$, $\sigma=15$')

# Tweak spacing to prevent clipping of ylabel
fig.tight_layout()
plt.show()
六、scipy教程
七、tensorflow
# 导入tensorflow库简写为tf,并输出版本
import tensorflow as tf
tf.__version__
7.1 Tensor张量
- 常量
# 创建一个3x3的0常量张量
c = tf.zeros([3, 3])
# 根据张量的形状,创建一个一样形状的1常量张量
tf.ones_like(c)
# 创建一个2x3,数值全为6的常量张量
tf.fill([2, 3], 6) # 2x3全为6的常量Tensor
# 创建3x3随机的随机数组
tf.random.normal([3,3])
# 通过二维数组创建一个常量张量
a = tf.constant([[1, 2], [3, 4]]) # 形状为(2, 2)的二维常量
# 取出张量中的numpy数组
a.numpy()
# 从1.0-10.0等间距取出5个数形成一个常量张量
tf.linspace(1.0, 10.0, 5)
# 从1开始间隔2取1个数字,到大等于10为止
tf.range(start=1, limit=10, delta=2)
- 运算
# 将两个张量相加
a + a
# 将两个张量做矩阵乘法
tf.matmul(a, a)
# 两个张量做点乘
tf.multiply(a, a)
# 将一个张量转置
tf.linalg.matrix_transpose(c)
# 将一个12x1张量变形成3行的张量
b = tf.linspace(1.0, 10.0, 12)
tf.reshape(b,[3,4])
## 方法二
tf.reshape(b,[3,-1])
7.2 自动微分
这一部分将会实现y=x^2在x=1处的导数
- 变量
# 新建一个1x1变量,值为1
x = tf.Variable([1.0])
# 新建一个GradientTape追踪梯度,把要微分的公式写在里面
with tf.GradientTape() as tape: # 追踪梯度
y = x * x
# 求y对于x的导数
grad = tape.gradient(y, x) # 计算梯度
7.3 线性回归案例
这一部分将生成添加随机噪声的沿100个y=3x+2的数据点,再对这些数据点进行拟合。
# 生成X,y数据,X为100个随机数,y=3X+2+noise,noise为100个随机数
X = tf.random.normal([100, 1]).numpy()
noise = tf.random.normal([100, 1]).numpy()
y = 3*X+2+noise
# 可视化这些点
plt.scatter(X, y)
# 创建需要预测的参数W,b(变量张量)
W = tf.Variable(np.random.randn())
b = tf.Variable(np.random.randn())
print('W: %f, b: %f'%(W.numpy(), b.numpy()))
# 创建线性回归预测模型
def linear_regression(x):
return W * x + b
# 创建损失函数,此处采用真实值与预测值的差的平方
def mean_square(y_pred, y_true):
return tf.reduce_mean(tf.square(y_pred-y_true))
# 创建GradientTape,写入需要微分的过程
with tf.GradientTape() as tape:
pred = linear_regression(X)
loss = mean_square(pred, y)
# 对loss,分别求关于W,b的偏导数
dW, db = tape.gradient(loss, [W, b])
# 用最简单朴素的梯度下降更新W,b,learning_rate设置为0.1
W.assign_sub(0.1*dW)
b.assign_sub(0.1*db)
print('W: %f, b: %f'%(W.numpy(), b.numpy()))
# 以上就是单次迭代的过程,现在我们要继续循环迭代20次,并且记录每次的loss,W,b
for i in range(20):
with tf.GradientTape() as tape:
pred = linear_regression(X)
loss = mean_square(pred, y)
dW, db = tape.gradient(loss, [W, b])
W.assign_sub(0.1*dW)
b.assign_sub(0.1*db)
print("step: %i, loss: %f, W: %f, b: %f" % (i+1, loss, W.numpy(), b.numpy()))
# 画出最终拟合的曲线
plt.plot(X, y, 'ro', label='Original data')
plt.plot(X, np.array(W * X + b), label='Fitted line')
plt.legend()
plt.show()
PB
这种 PB 文件是表示 MetaGraph 的 protocol buffer格式的文件,MetaGraph 包括计算图,数据流,以及相关的变量和输入输出signature以及 asserts 指创建计算图时额外的文件。
这是我找到第一个MetaGraph的解释,比较容易懂:
When you are saving your graph, a MetaGraph is created. This is the graph itself, and all the other metadata necessary for computations in this graph, as well as some user info that can be saved and version specification.
主要使用tf.SavedModelBuilder 类来完成这个工作,并且可以把多个计算图保存到一个 PB 文件中,如果有多个MetaGraph,那么只会保留第一个 MetaGraph 的版本号,并且必须为每个MetaGraph 指定特殊的名称 tag 用以区分,通常这个名称 tag 以该计算图的功能和使用到的设备命名,比如 serving or training, CPU or GPU。
我们来看看典型的保存 PB 文件的代码:
import tensorflow as tf import os from tensorflow.python.framework import graph_util
pb_file_path = os.getcwd()
with tf.Session(graph=tf.Graph()) as sess: x = tf.placeholder(tf.int32, name='x') y = tf.placeholder(tf.int32, name='y') b = tf.Variable(1, name='b') xy = tf.multiply(x, y) # 这里的输出需要加上name属性 op = tf.add(xy, b, name='op_to_store')
sess.run(tf.global_variables_initializer())
# convert_variables_to_constants 需要指定output_node_names,list(),可以多个
constant_graph = graph_util.convert_variables_to_constants(sess, sess.graph_def, ['op_to_store'])
# 测试 OP
feed_dict = {x: 10, y: 3}
print(sess.run(op, feed_dict))
# 写入序列化的 PB 文件
with tf.gfile.FastGFile(pb_file_path+'model.pb', mode='wb') as f:
f.write(constant_graph.SerializeToString())
# 输出
# INFO:tensorflow:Froze 1 variables.
# Converted 1 variables to const ops.
# 31
加载 PB 模型文件典型代码:
from tensorflow.python.platform import gfile
sess = tf.Session() with gfile.FastGFile(pb_file_path+'model.pb', 'rb') as f: graph_def = tf.GraphDef() graph_def.ParseFromString(f.read()) sess.graph.as_default() tf.import_graph_def(graph_def, name='') # 导入计算图
需要有一个初始化的过程
sess.run(tf.global_variables_initializer())
需要先复原变量
print(sess.run('b:0'))
1
输入
input_x = sess.graph.get_tensor_by_name('x:0') input_y = sess.graph.get_tensor_by_name('y:0')
op = sess.graph.get_tensor_by_name('op_to_store:0')
ret = sess.run(op, feed_dict={input_x: 5, input_y: 5}) print(ret)
输出 26
另外保存为 save model 格式也可以生成模型的 PB 文件,并且更加简单。
import tensorflow as tf import os from tensorflow.python.framework import graph_util
pb_file_path = os.getcwd()
with tf.Session(graph=tf.Graph()) as sess: x = tf.placeholder(tf.int32, name='x') y = tf.placeholder(tf.int32, name='y') b = tf.Variable(1, name='b') xy = tf.multiply(x, y) # 这里的输出需要加上name属性 op = tf.add(xy, b, name='op_to_store')
sess.run(tf.global_variables_initializer())
# convert_variables_to_constants 需要指定output_node_names,list(),可以多个
constant_graph = graph_util.convert_variables_to_constants(sess, sess.graph_def, ['op_to_store'])
# 测试 OP
feed_dict = {x: 10, y: 3}
print(sess.run(op, feed_dict))
# 写入序列化的 PB 文件
with tf.gfile.FastGFile(pb_file_path+'model.pb', mode='wb') as f:
f.write(constant_graph.SerializeToString())
# INFO:tensorflow:Froze 1 variables.
# Converted 1 variables to const ops.
# 31
# 官网有误,写成了 saved_model_builder
builder = tf.saved_model.builder.SavedModelBuilder(pb_file_path+'savemodel')
# 构造模型保存的内容,指定要保存的 session,特定的 tag,
# 输入输出信息字典,额外的信息
builder.add_meta_graph_and_variables(sess,
['cpu_server_1'])
添加第二个 MetaGraphDef
with tf.Session(graph=tf.Graph()) as sess:
...
builder.add_meta_graph([tag_constants.SERVING])
...
builder.save() # 保存 PB 模型 保存好以后到saved_model_dir目录下,会有一个saved_model.pb文件以及variables文件夹。顾名思义,variables保存所有变量,saved_model.pb用于保存模型结构等信息。
这种方法对应的导入模型的方法:
with tf.Session(graph=tf.Graph()) as sess: tf.saved_model.loader.load(sess, ['cpu_1'], pb_file_path+'savemodel') sess.run(tf.global_variables_initializer())
input_x = sess.graph.get_tensor_by_name('x:0')
input_y = sess.graph.get_tensor_by_name('y:0')
op = sess.graph.get_tensor_by_name('op_to_store:0')
ret = sess.run(op, feed_dict={input_x: 5, input_y: 5})
print(ret)
只需要指定要恢复模型的 session,模型的 tag,模型的保存路径即可,使用起来更加简单
这样和之前的导入 PB 模型一样,也是要知道tensor的name。那么如何可以在不知道tensor name的情况下使用呢,实现彻底的解耦呢? 给add_meta_graph_and_variables方法传入第三个参数,signature_def_map即可。
PS: 写完文章才发现,保存为 ckpt 的时候也可以直接加载网络结构,而不用再重新再定义一次,使用方式如下:
def restore_model_ckpt(ckpt_file_path): sess = tf.Session()
# 《《《 加载模型结构 》》》
saver = tf.train.import_meta_graph('./ckpt/model.ckpt.meta')
# 只需要指定目录就可以恢复所有变量信息
saver.restore(sess, tf.train.latest_checkpoint('./ckpt'))
# 直接获取保存的变量
print(sess.run('b:0'))
# 获取placeholder变量
input_x = sess.graph.get_tensor_by_name('x:0')
input_y = sess.graph.get_tensor_by_name('y:0')
# 获取需要进行计算的operator
op = sess.graph.get_tensor_by_name('op_to_store:0')
# 加入新的操作
add_on_op = tf.multiply(op, 2)
ret = sess.run(add_on_op, {input_x: 5, input_y: 5})
print(ret)
这样看来,CKPT 在使用 TensorFlow 框架下使用还是挺方便的。
读变量
import os
import path
import numpy as np
from tensorflow.python import pywrap_tensorflow
checkpoint_path='./checkpoints/VGG_VOC0712_SSD_300x300_ft_iter_120000.ckpt/VGG_VOC0712_SSD_300x300_ft_iter_120000.ckpt'
# print(path.getcwdu())
print(checkpoint_path)
#read data from checkpoint file
reader=pywrap_tensorflow.NewCheckpointReader(checkpoint_path)
var_to_shape_map=reader.get_variable_to_shape_map()
data_print=np.array([])
for key in var_to_shape_map:
print('tensor_name',key)
ckpt_data=np.array(reader.get_tensor(key))#cast list to np arrary
ckpt_data=ckpt_data.flatten()#flatten list
data_print=np.append(data_print,ckpt_data,axis=0)
print(data_print,data_print.shape,np.max(data_print),np.min(data_print),np.mean(data_print))
7.4 变量保存&读取
这一部分,我们实现最简单的保存&读取变量值
# 新建一个Checkpoint对象,并且往里灌一个刚刚训练完的数据
save = tf.train.Checkpoint()
save.listed = [fc3_b]
save.mapped = {'fc3_b': save.listed[0]}
# 利用save()的方法保存,并且记录返回的保存路径
save_path = save.save('/home/kesci/work/data/tf_list_example')
print(save_path)
# 新建一个Checkpoint对象,从里读出数据
restore = tf.train.Checkpoint()
fc3_b2 = tf.Variable(tf.zeros([10]))
print(fc3_b2.numpy())
restore.restore(save_path)
print(fc3_b2.numpy())
7.5 tensorflow固化模型
https://blog.csdn.net/yjl9122/article/details/78341689
八、python压缩
压缩文件格式一般有下列几种:
gz:即gzip,通常只能压缩一个文件。与tar结合起来就可以实现先打包,再压缩。
tar:linux系统下的打包工具,只打包,不压缩
tgz:即tar.gz。先用tar打包,然后再用gz压缩得到的文件
zip:不同于gzip,虽然使用相似的算法,可以打包压缩多个文件,不过分别压缩文件,压缩率低于tar。
rar:打包压缩文件,最初用于DOS,基于window操作系统。压缩率比zip高,但速度慢,随机访问的速度也慢。
- gz
由于gz一般只压缩一个文件,所有常与其他打包工具一起工作。比如可以先用tar打包为XXX.tar,然后在压缩为XXX.tar.gz
import gzip
import os
def un_gz(file_name):
"""ungz zip file"""
f_name = file_name.replace(".gz", "")
#获取文件的名称,去掉
g_file = gzip.GzipFile(file_name)
#创建gzip对象
open(f_name, "w+").write(g_file.read())
#gzip对象用read()打开后,写入open()建立的文件中。
g_file.close()
#关闭gzip对象
- tar
XXX.tar.gz解压后得到XXX.tar,还要进一步解压出来。
import tarfile
def un_tar(file_name):
untar zip file"""
tar = tarfile.open(file_name)
names = tar.getnames()
if os.path.isdir(file_name + "_files"):
pass
else:
os.mkdir(file_name + "_files")
#由于解压后是许多文件,预先建立同名文件夹
for name in names:
tar.extract(name, file_name + "_files/")
tar.close()
- zip
与tar类似,先读取多个文件名,然后解压,如下:
import zipfile
def un_zip(file_name):
"""unzip zip file"""
zip_file = zipfile.ZipFile(file_name)
if os.path.isdir(file_name + "_files"):
pass
else:
os.mkdir(file_name + "_files")
for names in zip_file.namelist():
zip_file.extract(names,file_name + "_files/")
zip_file.close()
- rar
import rarfile
import os
def un_rar(file_name):
"""unrar zip file"""
rar = rarfile.RarFile(file_name)
if os.path.isdir(file_name + "_files"):
pass
else:
os.mkdir(file_name + "_files")
os.chdir(file_name + "_files"):
rar.extractall()
rar.close()
- tar打包
在写打包代码的过程中,使用tar.add()增加文件时,会把文件本身的路径也加进去,加上arcname就能根据自己的命名规则将文件加入tar包
# 打包代码:
import tarfile
import os
import time
start = time.time()
tar=tarfile.open('/path/to/your.tar,'w')
for root,dir,files in os.walk('/path/to/dir/'):
for file in files:
fullpath=os.path.join(root,file)
tar.add(fullpath,arcname=file)
tar.close()
print time.time()-start
在打包的过程中可以设置压缩规则,如想要以gz压缩的格式打包:tar=tarfile.open('/path/to/your.tar.gz','w:gz'),其他格式如下表:(tarfile.open的mode有很多种)
| mode | action |
| 'r' or 'r:*' | Open for reading with transparent compression (recommended). |
| 'r:' | Open for reading exclusively without compression. |
| 'r:gz' | Open for reading with gzip compression. |
| 'r:bz2' | Open for reading with bzip2 compression. |
| 'a' or 'a:' | Open for appending with no compression. The file is created if it does not exist. |
| 'w' or 'w:' | Open for uncompressed writing. |
| 'w:gz' | Open for gzip compressed writing. |
| 'w:bz2' | Open for bzip2 compressed writing. |
* tar解包
tar解包也可以根据不同压缩格式来解压。
import tarfile
import time
start = time.time()
t = tarfile.open("/path/to/your.tar", "r:")
t.extractall(path = '/path/to/extractdir/')
t.close()
print time.time()-start
tar = tarfile.open(filename, 'r:gz')
for tar_info in tar:
file = tar.extractfile(tar_info)
do_something_with(file)